
If you’ve been using Power Automate flows to send notification emails to people in your organisation then there’s a fair chance you’ve run into a requirement to send a table of results in the email. This is a regular occurence in my organisation, and I’ve run into some limitations with the standard “Create HTML Table” action so in this blog I’ll explore them and demonstrate how I’ve managed to work around them.

The Situation
For the purposes of demonstrating this Flow I’m going to use the scenario where I’ve created a Quote for my customer and I want to email it to them using a Power Automate flow.
The Solution
There is an action in Power Automate called “Create HTML Table” and it will probably suffice for most usage scenarios. In the extract from my Flow below I’ve covered the key steps to create a table from a list of CDS records:

1. List CDS records – we use the List Records action to retrieve a list of records from CDS. Similarly, you could retrieve records from SharePoint (or any other data source).
2. Select – we use the Select action to specify matching key:value pairs from the returned records from the List CDS records step above. The easiest way to think about this is that the first column is the “Headers” for the table, whilst the dynamic values in the second column are the “rows” for the table
3. Create HTML Table – the final step to create the HTML table is to use the Create HTML Table action. As we’ve specified the Columns in the Select action above, we set the Columns to automatic.
Now that we have a HTML table generated, we can insert it into an email, or a Teams message, or create a PDF with it, or any other approriate action you can think of.
For the purposes of this demo I’m going to send it in an email, and I’ll include some of the details from the parent Quote record. The Send an Email action looks like this:
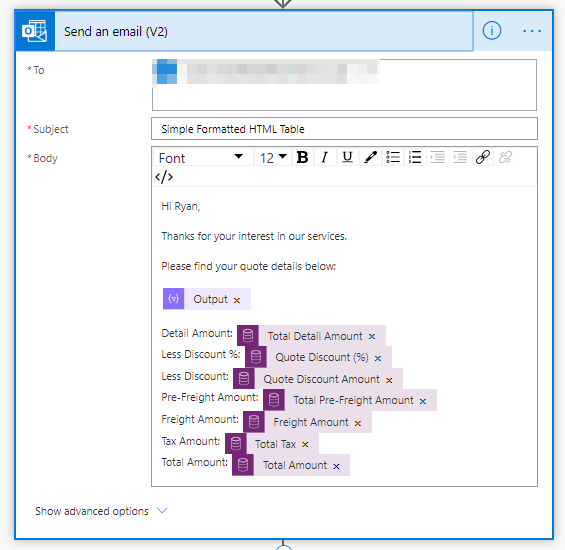
The output from this action looks like this:

As you can see, it works but the styling leaves a bit to be desired so let’s see if we can pretty it up a bit.
INjecting CSS Styling
One way we can do some styling is to add a CSS stylesheet to our HTML. We can do this by prefixing the output from the Create HTML Table step with some additional HTML using a Compose step. You can use internal CSS in HTML by using the <style> element, and we can do that in the compose step like this:

The HTML style element with the CSS that i used is below if you want to copy and paste it:
<style>
table {
  border: 1px solid #1C6EA4;
  background-color: #EEEEEE;
  width: 100%;
  text-align: left;
  border-collapse: collapse;
}
table td, table th {
  border: 1px solid #AAAAAA;
  padding: 3px 2px;
}
table tbody td {
  font-size: 13px;
}
table thead {
  background: #1C6EA4;
  border-bottom: 2px solid #444444;
}
table thead th {
  font-size: 15px;
  font-weight: bold;
  color: #FFFFFF;
  border-left: 2px solid #D0E4F5;
}
table thead th:first-child {
  border-left: none;
}
</style>
I used the table designer at http://divtable.com/table-styler/ to give me inspiration for the CSS, and the output with the styling added looks like this:

I think this looks much better, it’s more readable and a bit friendlier, but I still think it can be improved on. One of the things I experimented with was alternate colours for rows, but unfortunately Outlook seems to ignore this CSS styling. In order to get alternate rows, and to include the information at the bottom the email in the table, we’re going to have to get creative!
Advanced StylinG
The good news is that we can achieve some quite complicated styling using a mix of HTML and CSS. The bad news is that it’s slightly more complex and therefore we can’t use the simple “Create HTML Table” action. The output from my advanced styling looks like this:

I think this is a huge improvement, and looks really professional. The Flow to create this table is slightly longer, but I think it is pretty straightforward to follow. I’ve outlined it below and I’ll go through each step in turn

1. Trigger – in this Flow I’m using “when a record is updated”, but of course you can use any trigger
2. Initialize RowNumber Integer Variable – the first action is to create a new Integer variable called RowNumber. We’ll use this as part of our Apply to Each loop later in the Flow, but for the time being we’ll default it to 0

3. Initialize TableHTML String Variable – the next action is to create a new String variable called TableHTML. In this we’re going to set the Table Headers. We can also use some inline CSS style elements to set the table style and to set the table header style. We can also set the width of each column.

4. List Records – in this scenario I want to send a quote in an email to a client, so I’m going to get the related Quote Lines. In your own scenario you may wish to retrieve different records, or items from a SharePoint list

5. Apply to Each – next we’re going to loop through the items that are returned from the List step above. There are two actions inside the loop

5A. Increment RowNumber by 1 – in this action we’ll increase the RowNumber variable by 1 so we can identify which loop we’re on, and we’ll use this in the next step to identify if we’re in an even or odd row

5B. Append Product Row to TableHTML – in this step we’re using an Append to String Variable action to add more HTML table rows to the TableHTML. The HTML code we’re using is below:
        <tr style="background-color:@{if(equals(mod(variables('RowNumber'),2),0),'white','#e1e1e1')};">
            <td>@{items('Apply_to_each')?['productdescription']}</td>
            <td>@{formatNumber(items('Apply_to_each')?['priceperunit'],'C','en-GB')}</td>
            <td>@{items('Apply_to_each')?['quantity']}</td>
            <td>@{if(equals(null,items('Apply_to_each')?['manualdiscountamount']),formatnumber(0,'C','en-GB'),formatnumber(items('Apply_to_each')?['manualdiscountamount'],'C','en-GB'))}</td>
            <td>@{formatnumber(items('Apply_to_each')?['extendedamount'],'C','en-GB')}</td>
        </tr>

There are some key elements to consider here:
- First, we’re setting the background colour of the row by using some inline CSS within the <tr> element. We have an IF condition in here as follows
“if(equals(mod(variables(‘RowNumber’),2),0),’#ffffff’,’#e1e1e1′)”
This works by using the MOD expression to check if the RowNumber variable is divisible by 2. The MOD expression returns the remainder from dividing two numbers. If this equals zero we know we’re on an even row, while if it returns any value other than zero we’re on an odd row. We can then use the IFTRUE and IFFALSE to set alternating row colours. - We use the FormatNumber expression to set the currency values to the appropriate currency, e.g.
“formatNumber(items(‘Apply_to_each’)?[‘priceperunit’],’C’,’en-GB’)” - We won’t have a discount applied to each line item, so we need to check if the returned value is null and, if so, set it to 0, i.e.
“if(equals(null,items(‘Apply_to_each’)?[‘manualdiscountamount’]),formatnumber(0,’C’,’en-GB’),formatnumber(items(‘Apply_to_each’)?[‘manualdiscountamount’],’C’,’en-GB’))”
6. Append Footer to TableHTML – in the first two examples I demonstrated above the values from the parent record weren’t included in the table, which looked a little bit messy. In order to include them we can append some more HTML to the TableHTML variable. We also know that we want the rows containing subtotals and totals to be bold and to have a different colour background, so we can include some more inline CSS styling for these.
The table we have created above has 5 columns but the final elements in the footer only use two columns, so we can also use a HTML colspan element to make the row labels span 4 columns, thereby ensuring the row values are in column 5

If you want to copy the HTML above, then it is below:
<tr  style="text-align:right; background:#c5c5c5; padding:3px">
    <td colspan="4" ><strong>Detail Amount:</strong></td>
    <td><strong>  @{formatnumber(triggerOutputs()?['body/totallineitemamount'],'C','en-GB')}  </strong></td>
</tr>
<tr style="text-align:right; background:#ffffff;padding:3px">
    <td colspan="4" >Less Discount %:</td>
    <td>@{formatnumber(div(triggerOutputs()?['body/discountpercentage'],100),'p','en-gb')} </td>
</tr>
<tr style="text-align:right; background:#ffffff;padding:3px">
    <td colspan="4">Less Discount:</td>
    <td>@{if(equals(null,triggerOutputs()?['body/discountamount']),formatnumber(0,'c','en-GB'),formatnumber(triggerOutputs()?['body/discountamount'],'C','en-GB'))} </td>
</tr>
<tr  style="text-align:right; background:#c5c5c5; padding:3px">
    <td colspan="4">
        <strong>Pre-Freight Amount:</strong></td>
    <td><strong>@{formatnumber(triggerOutputs()?['body/totalamountlessfreight'],'C','en-GB')}  </strong></td>
</tr>
<tr style="text-align:right; background:#ffffff;padding:3px">
    <td colspan="4" > Freight Amount:</td>
    <td>@{if(equals(null,triggerOutputs()?['body/freightamount']),formatnumber(0,'C','en-GB'),formatnumber(triggerOutputs()?['body/freightamount'],'C','en-GB'))} </td>
</tr>
<tr style="text-align:right; background:#ffffff;padding:3px">
    <td colspan="4"> Tax Amount:</td>
    <td>@{formatnumber(triggerOutputs()?['body/totaltax'],'C','en-GB')} </td>
</tr>
<tr  style="text-align:right; background:#c5c5c5; padding:3px">
    <td colspan="4"><strong>Total Amount:</strong></td>
    <td><strong>@{formatnumber(triggerOutputs()?['body/totalamount'],'C','en-GB')}  </strong></td>
</tr>
</tbody>
</table>
<br/>
7. Send an Email – we can use the Send an Email action to send the HTML table we created in an email, or we can use the Teams – Post a Message [STEP 8 above] to post the HTML table in a Teams channel.
Conclusion
This post demonstrates 3 different ways to create and display HTML tables using Power Automate flows:
- Simple – using a combination of the Select and Create HTML Table actions
- Intermediate – using a combination of the Select and Create HTML Table actions, and adding internal CSS using a Compose action
- Advanced – using manually created HTML tables with inline CSS styling, colspan elements and Flow expressions to add formatting
I found this an interesting challenge, and I think it demonstrates how we can get creative with Power Automate to achieve advanced functionality. If you found it useful, or if you have any questions or comments then please let me know!
If you’d like to learn more about HTML tables then I’d highly recommend reading the W3 Schools tutorials.

[…] Power Automate HTML Table Styling […]
LikeLike
This helped me out a lot!
I am using it to send out a weekly notification for my company’s visitor list, which is a SharePoint list.
At first I tried the CSS injection, which was a significant upgrade, but now I want the formatting to look even better so I’m going to try the more advanced method with the opening html code, a row for every entry, and the closing html code.
LikeLike
Thanks for letting me know Mark, I’m so glad it has helped you. If you have any specific questions I can help with then just get in touch!
LikeLike
Useful, thanks.
What do you think is the best way of moving data between forms is with PowerApps on update/create? Specifically thinking about sale items updating sale total fields.I’m finding Power Automate is to delayed to often.
Thanks again
LikeLike
Hey Terry, the issue you’ll face with Power Automate is that it is asynchronous. If you want more real time data updates then if you’re using CDS as a data source you could look at plugins, but it starts to get more “code” heavy that way
LikeLike
Really cool post, thanks Ryan! Just FYI, I found that the “CSS injection” works with Outlook, but not for instance with Gmail which totally ignores it… still researching why, but I imagine it must be due to how it parses the HTML/CSS content in the email body?
LikeLike
is there a way i can do conditional color formating?
Example i have column having Name Stage where it ha “Safe Stage” or “Risk Stage”
If stage col = Safe stage then green color cell background else red.
LikeLike
Hey Hita, sure, you can use the same logic I used to get the alternate row colours by to get the colours. You would then apply it to a specific cell by including the style tags within the tag, e.g.:
YOUR CONTENT HERE
LikeLike
That’s a fine solution, however not suitable for big (wide) tables that need to be converted to PDFs as so much content wouldn’t fit on a regular sized sheet.
I’d like to swap the headers for row headers, so they’re on the left side and the data to their right.
Any way of doing this?
LikeLike
Hey Miko, sure you could do this, but you’d have to do some more advanced HTML. See https://www.w3.org/WAI/tutorials/tables/two-headers/ for an example of how to do this
LikeLike
This is pretty nice. I didn’t need to do the advanced table and the CSS styling worked perfectly for my email except for another compose that was created to show a hyperlink as “click here”. Is there a way to do that in styling or as a variable of some sort?
LikeLike
[…] ✔ Ryan Maclean’s Blog on Formatting HTML Tables: https://ryanmaclean365.com/2020/01/29/power-automate-html-table-styling/ […]
LikeLike
Did you tried to add image column ( CDS Image ) in the table ? I guess image ( base64 value ) will not work with string . Please let me know your thoughts
LikeLike
I apologize for my bad English.
I did some tests and I couldn’t see it working in Outlook, did anyone have the same problem?
I put an image of my stream.
https://drive.google.com/file/d/1nhfeMHa2-O3CzMZn4r_1onCmdJyJBC-c/view?usp=sharing
LikeLike
I must have tried this at least 20 to 30 times and I keep getting the same error message:
Unable to process template language expressions in action ‘Append_to_string_variable’ inputs at line ‘1’ and column ‘2729’: ‘The template language function ‘formatNumber’ expects its first parameter to be an integer or a decimal number. The provided value is of type ‘String’. Please see https://aka.ms/logicexpressions#FormatNumber for usage details.’.
It get tripped up here: formatNumber(items(‘Apply_to_each’)?[‘Jan 20′],’C’,’en-GB’), whichis in the Append to Sring Variable. Can you help?
LikeLike
Hey Aaron,
If you want to email me at hello@ryanmaclean365.com with some screenshots of your flow with the actions opened, and a copy of the JSON that you’re using for the Apply to Each loop I should be able to help you
LikeLike
Hi,
This post has helped me a lot, especially apart from all other simple posting and sending an email to users with only the normal text you have come up with some add-on features of CSS which is more attractive to my users and other members as well. I would really like to thank you for your efforts and moreover for the latest post released.
Thanks
Kind Regards
Tapesh
LikeLike
Dear Ryan,
thanks a lot for this page. I can now send every week the list of meetings happening in a specific room within a nicely formatted table. Looking forward to reading all you wrote about Flow !
Christophe
LikeLike
[…] POWER AUTOMATE HTML TABLE STYLING: https://ryanmaclean365.com/2020/01/29/power-automate-html-table-styling/ […]
LikeLike
Hello, I am using the template you provided to create a table. How can I change the color of the first row?
LikeLike
Hi Theresa, do you mean the header row, or the first row of values?
LikeLike
Hi Ryan, i’m not sure i quite grasp the full concept here – i’m trying to create a simple (ha), responsive email with paragraphs and one image in a table that has a max-width and then should just collapse as the viewport shrinks – i’ve tried to write the HTML into the ‘send email V2’ connector in Automate and then use the ‘Compose’ connector to style this – doesn’t seem to work though? i wonder if microsoft outlook itself just does not respect basic CSS? we can’t get it to maintain the max-width of 600 pixels within the basic HTML WYSIWYG editor under Automate but i am starting to think the product just will not take CSS beyond a very basic point.
LikeLike
Hi Simo,
You’re right that Outlook won’t respect all CSS, it uses a fairly basic implementation. I’ve not managed to find any documentation that outlines what is and is not allowed, so it is mostly trial and error for me
LikeLike
I am using a sharepoint list to get my data. I am getting an error on my format number. Can you help?
LikeLike
Hey Melissa, drop me an email to hello@ryanmaclean365.com with the issue you’re facing and I’ll see if I can offer any advice
LikeLike
Ryan/Melissa, I am also using a SharePoint list to get my data. Did you ever tackle/solution this?
LikeLike
Hey Jay, drop me an email to hello@ryanmaclean365.com and I’ll see if I can help
LikeLike
Thank you Ryan for your help yesterday! My solution now works like a charm!
LikeLiked by 1 person
Hey Joanne, glad I was able to help and that you have it working now!
LikeLike
[…] POWER AUTOMATE HTML TABLE STYLING: https://ryanmaclean365.com/2020/01/29/power-automate-html-table-styling/ […]
LikeLike
[…] ✔ Ryan Maclean’s Blog on Formatting HTML Tables: https://ryanmaclean365.com/2020/01/29/power-automate-html-table-styling/ […]
LikeLike
Hey Ryan, just want to send a big shout out to you and your page and give you credit. Your work has enabled me to fill in the gaps and create a weekly report flow with full cell based RAG colours and completely change the way we work. No more PowerPoint slide creating, dumping information form one place to the other, wasted effort. I now have a recurring trigger and an Ad-hoc request for report all driven from the SP list source.
Next is how to add a Flow run button onto SP page.
LikeLike
Thanks a lot for this post, you made my day.
LikeLike
[…] The styling comes from Ryan Maclean his great post Power Automate HTML table styling. […]
LikeLike
Hey Ryan,
This has been a great help. I’m trying to do the same thing but post the table into Teams and I’m not getting any formatting working. Any ideas as to what to tweak for this?
LikeLike
Hey Ryan, great stuff here. Based on your solutions above, could you offer any advise on how to show 2 tables side by side in an email? Cheers Nigel
LikeLike
[…] 8. Add a Compose action. I used some CSS from Ryan Maclean again, check out his blog, Power Automate HTML table styling. […]
LikeLike
[…] quite like the output design of this HTML, so I did a quick search and came across this blog which gave fantastic examples of HTML Styling. I created a Compose Action, which I renamed Style and […]
LikeLike