*** Please note, since releasing this blog I optimised the solution to calculate working days to make it more accurate, you can read more in this blog post ***
I’ve been working on a Flow recently that requires either the total amount of days between two dates, or the amount of working days (i.e. total days minus weekends and holidays), and the lack of a proper DateDiff expression in Power Automate has been a bit of a headache for me to work around.
If you’ve ever worked with Excel then you’ll know that the networkdays formula would be perfect for this scenario, so I wanted to see if I could replicate this in a Flow.
The Setup
The networkdays formula takes three parameters:
- Start Date
- End Date
- Holidays (an array containing a list of holiday dates)
We need to include the same parameters in our Flow, so you’ll need to ensure that your trigger contains this information, or that you can gather it within your Flow.
The Solution
The Flow that I created is below, and I’ll go through each step in turn to explain what I’ve done

1. Trigger – For this Flow I’m using a manual trigger that takes the three parameters I outlined above. Of course you could also get this to work from a CDS record or any other trigger. The Holidays are required to be input in a “yyyy-MM-dd” format, separated by a comma. I’ve also experimented with retrieving the holidays from the Gov.UK Bank Holidays API, the important thing is to be able to construct an array of Holiday days.

2. Initialize HolidaysArray – The first action is to take the comma-separated list of Holidays from the trigger and convert it to an array so we can use it later in the Flow. We do this using the Split expression; this will convert a comma-separated list such as 2019-12-25,2019-12-26,2020-01-01,2020-01-02,2020-04-10 into an array that looks like:
[
"2019-12-25",
"2019-12-26",
"2020-01-01",
"2020-01-02",
"2020-04-10"
]

3. Compose StartDateTicks – in Excel dates are stored as sequential serial numbers starting with 1 for January 1 1900. Unfortunately, Power Automate doesn’t do the same thing, so we need to be slightly more creative in order to calculate the number of whole days between two dates; the ticks function gives the nanosecond interval for a specified datetime. For example, the date 10 December 2019 has a tick value of 637115328000000000. We use the compose action to convert the input start date to it’s representative tick value

4. Compose EndDateTicks – as above, use another Compose action to convert the input end date to it’s representative tick value

5. Initialize FullDays integer Variable – Now that we have the tick values for the start date and the end date, we can subtract the start date from the end date then divide the result 864000000000 to convert the result to the number of days. We also add 1 to this result to give us the total number of whole days between the start date and end date, inclusive of the end date. The expression we use is
add(div(sub(outputs('EndDateTicks'),outputs('StartDateTicks')),864000000000),1)

Note: The next 7 steps in the Flow (Step 6 – Step 12) will help us to calculate the number of working days in the total number of days we had returned above.
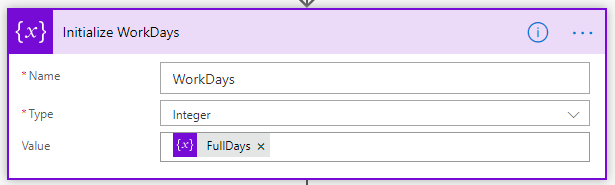
6. Initialize WorkDays Integer Variable – now that we have the Full Days calculated, we’ll initialize another Integer Variable to calculate the Working Days. When we initialize it we’ll set the default value to the FullDays value and we’ll decrement it in subsequent steps
7. Decrement WorkDays by 2 for each Full Week – we know that in any given 7 day period there will be two weekend days, so we need to remove these from the total number of days returned above. The way we do this is to divide the total number of days value by 7, then multiply it by 2, and then subtract this result from the total number of days.
For example, if you had 14 days total, then you could divide this by 7 (giving 2), then multiply it by 2 (giving 4), and subtract this from 14 (giving 10). This tells you that in a 14 day period there are 10 working days and 4 weekend days. The expression we use to calculate this is:
mul(div(variables('Days'),7),2))

8. Decrement WorkDays by 1 if Start and End are the same day on a weekend – we need to account for situations in which the Start Day and End Day are the same day of the week (i.e. it starts and ends on Sunday). If it is midweek then we don’t need to do anything, but if it’s a weekend then we need to ensure we’re decrementing the WorkDays value by 1. The reason for this is that if we started and finished on a Sunday, this would be 8 days in total. The calculation at step 7 would remove 2 days for each full week, but we’d also need to ensure we’re removing an additional 1 day to account for the weekend.
if(equals(dayofweek(triggerBody()['date']),dayofweek(triggerBody()['date_1'])),if(or(equals(dayofweek(triggerBody()['date']),0),equals(dayofweek(triggerBody()['date']),6)),1,0),0)

9. Decrement WorkDays by 2 if Start Sat & End Midweek – in this step we’re checking if the time period we’ve selected for the Flow starts on a Saturday and ends on a midweek day. If so, we want to decrement the WorkDays variable by 2
if(and(equals(dayofweek(triggerBody()['date']),6),not(or(equals(dayofweek(triggerBody()['date_1']),0),equals(dayofweek(triggerBody()['date_1']),6)))),2,0)

10. Decrement WorkDays by 1 if Start Sun & End Midweek – this step is almost the exact same as above, but this time we’re checking if the time period starts on a Sunday and ends on a midweek day. If so, we want to Decrement the WorkDays variable by 1
if(and(equals(dayofweek(triggerBody()['date']),0),not(or(equals(dayofweek(triggerBody()['date_1']),0),equals(dayofweek(triggerBody()['date_1']),6)))),1,0)

11. Decrement WorkDays by 1 if Start Midweek & End Sat – this action is the inverse of Step 9; we’re checking to see if the time period selected starts on a midweek day and ends on a Saturday. If so, we want to Decrement the WorkDays variable by 1
if(and(not(or(equals(dayofweek(triggerBody()['date']),0),equals(dayofweek(triggerBody()['date']),6))),equals(dayofweek(triggerBody()['date_1']),6)),1,0)

12. Decrement WorkDays by 2 if Start Midweek & End Sun – as above, this is the inverse of Step 10; we’re checking to see if the time period selected starts on a midweek day and ends on a Sunday. If so, we want to Decrement the WorkDays variable by 2
if(and(not(or(equals(dayofweek(triggerBody()['date']),0),equals(dayofweek(triggerBody()['date']),6))),equals(dayofweek(triggerBody()['date_1']),0)),2,0)

NOTE: it would probably make more sense to have the decrement actions above contained within a Switch action to make your Flow more efficient
13. Initialize HolidaystoRemove – for this step we’re initializing another integer variable that we’ll use in the Condition in Step 14 to count the number of Holidays that occur in the selected time period

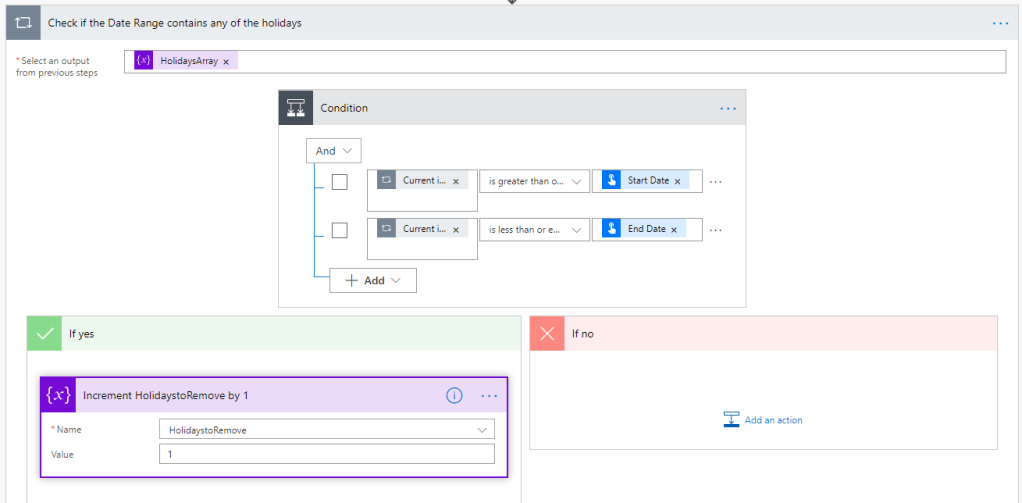
14. Check if the Date Range contains any of the holidays – for this step we’re going to iterate through the Holidays array we created in step 2 and check if that date is in between the Start Date and End Date of the time period we selected, using an “is greater than or equal to” and “is less than or equal to” condition respectively. If the holiday is in the time period, we’ll increment the HolidaystoRemove variable by 1.
15. Decrement WorkDays by HolidaystoRemove – Once we’ve iterated through all the holidays, we then Decement the WorkDays variable by the HolidaystoRemove variable, and this will give us our final amount of Working Days in our selected Time Period

16. Response – the final step in my Flow is a Response action. I’m going to be calling this Flow as a child flow from another one, so I need the response to return the information. In my response I have 3 outputs:
- Total Days
- Working Days
- Holidays Removed

Conclusions
This Flow was a bit more frustrating than I’d expected to try and pull together, and it involves some hefty expressions, but I’ve tested it pretty thoroughly and its worked in all the scenarios I’ve thrown at it, but I’d love for other people to do more testing.
I would love to get your feedback on whether you think this is useful, or if you think I’ve missed anything or made any mistakes!
If you’d like to download a copy of this Flow please click here