I saw a tweet recently from Linn Zaw Win asking if it was possible to change a Users Business Unit without losing their Security Roles
If you’ve been following my blog you might be aware that I posted a solution to do this using North52 last year, but I wondered whether it would be possible to do this with Power Automate now.
The Setup
As we can’t run pre-validation Flows to retrieve a the prior value when we change a field in D365, we need to add another lookup to the Business Unit entity from the User entity. I’ve creatively called it “New Business Unit” and we’ll be using this as the trigger for our Flow. In my scenario, if you want to change the Business Unit of a User you would select the one you wish to migrate them to by updating this field

The Solution

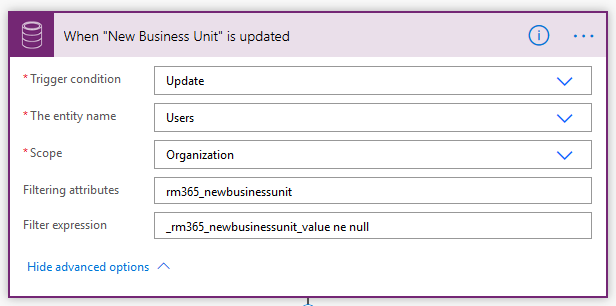
1. When “New Business Unit” is updated – the Flow trigger is when the “New Business Unit” field is updated, and we set the filter expression to ensure it isn’t triggered when the field equals null (i.e. if the field is cleared)

2. List Existing Security Roles – next we use a List Records action to retrieve the current list of Security Roles applied to the User. We have to use a FetchXML query to retrieve the list Roles; when you apply a Security Role to a User it creates a record in the systemuserroles entity, so we can retrieve the list of applied Roles for a given User by querying across this entity with some link-entity parameters. The FetchXML query we use is:
<fetch>
  <entity name="role" >
    <attribute name="name" />
    <attribute name="businessunitid" />
    <attribute name="roleid" />
    <link-entity name="systemuserroles" from="roleid" to="roleid" >
      <link-entity name="systemuser" from="systemuserid" to="systemuserid" >
        <filter>
          <condition attribute="systemuserid" operator="eq" value="@{triggerOutputs()?['body/systemuserid']}" />
        </filter>
      </link-entity>
    </link-entity>
  </entity>
</fetch>

3. Initialize roleFilterCondition – we’re going to use the roles we returned above to find the same roles under the new business unit with another FetchXML query. Before we do that we need to initialize an empty string variable to hold the FetchXML conditions we’ll create

4. Apply to each Existing Role – for each role we returned in step 2 we will append a condition to the roleFilterCondition variable we created in Step 3 in the following format:
<condition attribute="name" operator="eq" value="@{items('Apply_to_each_Existing_Role')?['name']}" />

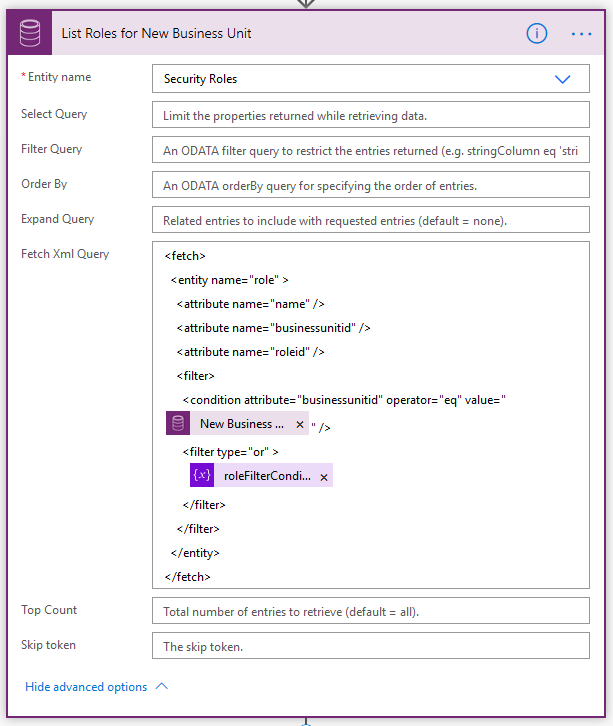
5. List Roles for New Business Unit – now that we’ve created our FetchXML conditions we’ll use a List Records step to retrieve the Security Roles for the new business unit that we picked for our User. The FetchXML we use for this query is:
<fetch>
  <entity name="role" >
    <attribute name="name" />
    <attribute name="businessunitid" />
    <attribute name="roleid" />
    <filter>
      <condition attribute="businessunitid" operator="eq" value="@{triggerOutputs()?['body/_rm365_newbusinessunit_value']}" />
      <filter type="or" >
        @{variables('roleFilterCondition')}
      </filter>
    </filter>
  </entity>
</fetch>

6. Update Business Unit – now that we’ve retrieved the new Security Roles we are going to be applying to the User we can change their Business Unit; to do this we use an Update Record action and set the Business Unit to the “New Business Unit” value. Changing the User’s Business Unit will remove their existing security roles.

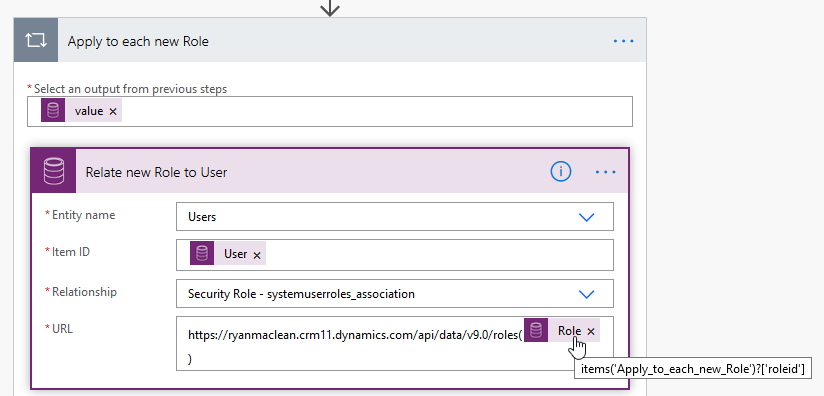
7. Apply to each New Role – we use another Apply to Each control to iterate through the values we returned in the List Records action in Step 5 above. For each Role we use the Relate Records action. The parameters for the Relate Records action are:
- Entity Name: Users
- Item ID: The User value from the trigger
- Relationship: systemuserroles_association
- URL: the full resource address for the Security Role

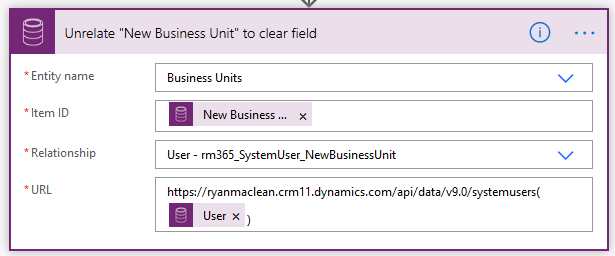
8. Unrelate “New Business Unit” to clear field – the final step in the Flow is to use the Unrelate Records action to clear the “New Business Unit” field so it can be used again in future. The schema is the same as in the Relate Records action, but we’re triggering it on the New Business Unit record

Conclusion
This method will enable you to update Business Units for Users in your organisation and have their Security Roles persist. You could extend this functionality to Teams as well. It is worth noting that this won’t work for Security Roles that are created for specific Business Units, and it may encounter issues if you have duplicate role names, but I think the basic functionality is quite useful. Let me know if you think is handy for you in the comments below!


[…] I was waiting for a low code solution to automate this and today I came across a post from Ryan Maclean who has found a solution using Power Automate. If you’re interested see: https://ryanmaclean365.com/2020/06/03/change-a-users-business-unit-and-retain-their-security-roles-u… […]
LikeLike
This is such a timer save. Thanks for sharing, Ryan.
LikeLike
Thanks Ryan for this wonderful solution. luckily now we have this setting, it for other users reading this wonderful article. https://nishantrana.me/2022/01/05/how-to-change-users-business-unit-without-removing-the-security-roles-in-dynamics-365-powerapps-enableownershipacrossbusinessunits-setting/
LikeLike