Finding Records Shared With a Specific Team or User

We recently made some changes to our data governance in my company that required me to change sharing permissions for a significant number of the Accounts in our Dynamics system. I needed to find all Accounts that were shared with a specific Team so I could then amend the permissions the Team had on each record.

As you may be aware, information relating to the Sharing of records in Dataverse/Dynamics 365 is held in the PrincipalObjectAccess table, so we will need to run a query against the POA table to find the records shared with our Team. For more info on the POA Table I’d recommend reading this blog post; it refers to CRM 2011, but it’s still valid information today.

There is no out-of-the-box way to search the POA table with Advanced Find so in order to to run the query you will need to use the FetchXML Builder in the XRMToolBox, created by Jonas Rapp, to create a query. The FetchXML Builder makes running advanced queries like this really easy, so if you’ve not used it before I’d highly recommend you start using it. If you’ve found it helpful then please consider donating a little bit to Jonas to thank him for creating this tool by clicking this link.

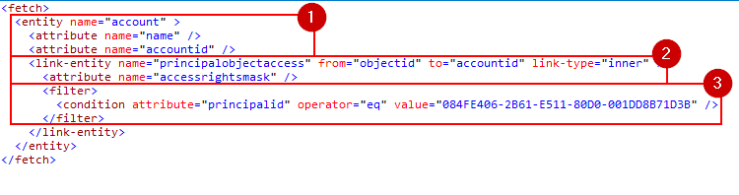
The FetchXML Query I used is:

<fetch>
  <entity name="account" >
    <attribute name="name" />
    <attribute name="accountid" />
    <link-entity name="principalobjectaccess" from="objectid" to="accountid" link-type="inner" >
      <attribute name="accessrightsmask" />
      <filter>
        <condition attribute="principalid" operator="eq" value="[YOUR_GUID_HERE]" />
      </filter>
    </link-entity>
  </entity>
</fetch>

To understand this FetchXML it helps to be aware some of the key columns from the PrincipalObjectAccess table

ColumnPurpose
principalIdthe GUID of the user or team with which the record is shared
objectIdthe GUID of the record that has been shared
accessrightsmaskA number that represents the level of access rights to the record for the team or user with whom it has been shared

With this information we can break down the FetchXML query as follows:

  1. Return a list of Accounts with the Attributes of the Account Name and AccounID
  2. Where there is an entry in the PrincipalObjectAccess table for the Account
  3. Where the Account has been shared with the named User/Team

I’ve also added the accessrightsmask as an attribute from the principalobjectaccess table to show me what rights the list of Accounts currently have. The returned list of results looks like this:

If you want to understand more about accessrightsmask codes then I’d recommend downloading Scott Sewell’s POA Decoder Ring from the link on this post on the CRM Tip of the Day blog.

Calculate Full Months between two dates with Power Automate

My friend Antti Pajunen recently asked me whether it is possible to calculate the number of months between two dates with Power Automate, akin to the DateDif function in Excel. I like a challenge, and I’ve done a lot of experimenting with dates in Power Automate so this is the solution I came up with.

The Scenario

In this scenario Antti was working with Managed Services contracts which will always run for full months (i.e. if the Start Date and End Date were 9th January 2020 – 15th December 2020, the contract would run from 1st January 2020 – 31st December 2020) and we therefore need to be able to calculate the number of full months between those dates (in this case that would be 12 months).

The Solution

The solution to this is a single Compose action with the following expression:

int(first(split(string(add(div(add(div(sub(ticks(addDays(startOfMonth(addToTime(triggerBody()['date_1'], 1, 'Month')), -1)), ticks(startofmonth(triggerBody()['date']))), 864000000000),1),div(365.25,12)),0.5)),'.')))

As this expression is lengthy and contains quite a few different functions I’ve broken it out below:

1. Compose Start of Month for Start Date – to get the start of the month for the start date we just use the startOfMonth function.

2. Compose End of Month for End Date – as there is no endOfMonth function in Power Automate we have to get slightly more creative to calculate the end of month. For my expression I add one month to the End Date, then use the startOfMonth function to get the 1st day of that month, then subtract one day to get the end of month date.

3. Compose DiffinDays – now that we have the proper Start Date and End Date we want to work with we need to calculate the total number of days between the dates. There is no datediff function in Power Automate, so we need to convert them to their ticks representation, then subtract the start date value from the end date value, then divide the result by 864000000000 and then add 1 to get the total number of days between the values. This can be seen below:

ticks value for End Date of 2020-12-31 = 637449696000000000

ticks value for Start Date of 2020-01-01 = 637134336000000000

637449696000000000 – 637134336000000000 = 315360000000000

315360000000000 / 864000000000 = 365

365 +1 = 366

4. Compose DiffinMonths – now that we have the total number of Days between the two dates we need to calculate the total number of months. In order to do that we divide the resulting value from above by 365.25/12. We use 365.25 to account for leap years, and divide 365.25 by 12 to get an average value for months. Using the example above:

366/(365/12) = 12.0246406

5. Compose DiffinMonth Round – the final step is to round the value returned from the step above to the closest integer. In order to do this we need to add 0.5 to the value as the rounding calculation always rounds down. We then convert the float value to a string, split it on the decimal point, take the first part of the value (i.e. the integer) and convert that back to an integer value.

The result from above would then convert 12.0246406 to 12, showing that there are 12 full months between 2020-01-01 – 2020-12-31.

Conclusion

To make this flow more efficient we combine all of the steps above into a single Compose action with the full expression:

If I’m honest, this is quite a long expression for what should be a relatively simple calculation, but in my testing it has worked consistently. I’d love to hear from others in the community if they find this useful or if they know of a more elegant solution. Drop me a comment below with your thoughts.

If you’d like to download a copy of this solution for yourself then click here.

Converting UTC Date Time to UNIX Time with Power Automate

Recently Ben Vollmer asked if it was possible to convert a UTC datetime value to Unix time in Power Automate. There’s no function available out of the box to do this, but it seemed pretty achievable to me and I’ve outlined the solution I came up with below.

According to Wikipedia, Unix time is a system for describing a point in time; it is the number of seconds that have elapsed since the Unix epoch, minus leap seconds. the Unix epoch is 00:00:00 UTC on 1 January 1970. Leap seconds are ignored with a leap second having the same Unix time as the second before it, and every day is treated as if it contains exactly 86400 seconds.

Since we know this, we just need to calculate how many seconds have passed between the Unix epoch and the datetime we want to convert.

The Solution

The solution is a single Compose action with the following expression:

div(sub(ticks(triggerBody()['text']),ticks('1970-01-01Z00:00:00')),10000000)

As this expression contains a few different functions, I’ve broken it out into separate actions below to explain how it works:

1. Convert Unix Epoch to Ticks representation – as there is no datediff function in Power Automate we need to use the ticks value for our dates to get the time difference between them. The ticks function gives us the 100 nanosecond interval for a specified datetime value.

2. Convert Input timestamps to Ticks representation – just like in the previous step we are converting the value we want to convert to Unix time to it’s ticks representation. In my Flow I’m using a manually triggered flow with a string input field, but you could use the utcNow() function to convert the current datetime or you could use convertToUtc() for a value from an existing data source.

3. Subtract Unix Epoch from Input Timestamp – now that we’ve converted the Unix Epoch and the Input Timestamp to their ticks representations, we subtract the Unix Epoch value from the Input Timestamp value and this will give us the amount of 100- nanosecond intervales that have elapsed between the dates.

4. Divide subtraction result by 1000000 to get Unix Time – As Unix Time is the amount of seconds that have elapsed since the Epoch we divide the 100-nanosecond intervals result by 1000000 to get the Unix Time value.

Conclusion

To make the Flow more efficient and to only use a single action we combine the 4 steps above into a single action to carry out our conversion

Unix time is useful for computer system to track and sort dated information in dynamic and distributed applications both online and client side as it is a point in time that does not change no matter where you are located on the globe.

If you’d like to download a copy of this solution for yourself then click here.

Converting Excel Date Time Serial Values With Power Automate

A common issue I’ve run into and that I’ve heard others experience, is trying to use Excel DateTime values in Power Automate. You will encounter an error like below:

The reason this is an issue is due to the way Excel stores dates and times:

  • Dates are stored as a number representing the number of days since 1900-01-00
  • Times are stored as a fractional portion of a 24 hour day

Thus, an excel datetime value can be represented as ddddd.tttttt

For example, the current date and time is 27 July 2020 15:20:54, which in Excel is represented by the value 44039.63951.

There are a couple of additional caveats to be aware of before we try to convert the dates:

  1. Excel counts 1900-01-01 as day 1 in it’s serial calculation, so you need to ensure you are counting this extra day in any date difference calculations.
  2. The Excel date serial is off by 1, as it behaves as if 1900-02-29 existed. This is due to a compatibility issue with Lotus 123 back when Excel was released and is a known issue (https://docs.microsoft.com/en-us/office/troubleshoot/excel/wrongly-assumes-1900-is-leap-year)

This means that the Excel date serial for a given day is off by 2 compared to the actual amount of days that have elapsed since 1900-01-01.

The Solution

The solution is a single compose action with the expression:

addseconds('1899-12-30',int(formatnumber(mul(float(triggerBody()['text']),86400),'0')))

This expression is a bit of a beast, so I’ve broken it down as follows:

1. Excel DateTime Serial to Float – Excel datetime serials are imported as a string value, so the first thing we need to do is convert it to a Float. For the purposes of this demo I’m using a manually triggered Flow with an input text field that I’m manually populating with the Excel datetime serial, but in a real-world implementation you would replace the triggerbody()[‘text’] value with your Excel date reference.

2. Multiply Float by 86400 – there are 86400 seconds in day, so we’re going to multiply the float value from the previous step by 86400 to calculate the amount of seconds we’re going to be adding later in the Flow.

3. formatNumber to convert Float to String – next we use a formatNumber function to convert the float output from above to a string value. Note, I’m not adding a locale parameter to the formatNumber expression as it defaults to en-US.

4. Convert String to Integer – we need an integer value to use in the addSeconds function, so we use the int function to convert the string value from above.

5. Add Seconds to 1899-30-12 – now that we have the integer value of the amount of seconds to add, we use the addSeconds function to add this to the date 1899-30-12. As indicated above, Excel DateTime serials are off by 2 days due to the caveats I outlined, therefore we add the seconds to 1899-30-12 (instead of 1900-01-01)

Conclusion

For the sake of efficiency we can combine the 5 steps above into a single Compose action using the expression I outlined at the start of the solution:

I was inspired to write this post following a tweet from Craig Porteous.

I iterated over my initial solution to come up with the above, but I am indebted to Jamie McAllister who released a video back in May that covers the same issue, so I’d recommend having a watch of that video at https://www.youtube.com/watch?v=X6Sn0RZNfyA

If you’d like to download a copy of the Power Automate Flow I created for this then click here.

Calculate Quarter for a Date in Power Automate

A common request in my company is for dates to be expressed in relation to the Quarter of the year in which they fall. Using Power Automate there is no native way of calculating this, so in this post I’m demonstrating two different methods to calculate the Quarter from a given input date:

  1. Nested IF Conditions
  2. Filtered Array

Nested IF Conditions

1. Trigger Flow – for the purposes of this demo I’m using a manual trigger with a date input, but of course it will work with any date so the logic can be implemented within a bigger flow

2. Calculate Month Number – the next step is to use a FormatDateTime function to convert the input date to the Month Number. We use the following expression to achieve this

formatdatetime(triggerBody()['date'], 'MM')

3. Calculate Quarter Number – the final step is to use the calculated Month number to work out which Quarter it is in. This is achieved with a set of nested IF conditions. The expression to use for this is:

if(
	or(
		equals(outputs('MonthNum'), '01'), 
		equals(outputs('MonthNum'), '02'), 
		equals(outputs('MonthNum'), '03')
		), 
	'Q1', 
	if(
		or(
			equals(outputs('MonthNum'), '04'), 
			equals(outputs('MonthNum'), '05'), 
			equals(outputs('MonthNum'), '06')
		), 
		'Q2', 
		if(
			or(
				equals(outputs('MonthNum'), '07'), 
				equals(outputs('MonthNum'), '08'), 
				equals(outputs('MonthNum'), '09')
			), 
			'Q3', 
			if(
				or(
					equals(outputs('MonthNum'), '10'), 
					equals(outputs('MonthNum'), '11'), 
					equals(outputs('MonthNum'), '12')
				), 
				'Q4', 
				'N/A'
			)
		)
	)
)

Filtered Array

1. Trigger Flow – as in the previous method, I’m using a manual trigger for the Flow with a Date input

2. Calculate Month Number – as in the previous method, the first action is to use a FormatDateTime expression to calculate Month Number from the input date

3. Compose Quarter Array – next we compose an Array that contains the Month Numbers and their related Quarter Number. The Array I used is:

[
  {
    "Month": "01",
    "Quarter": "Q1"
  },
  {
    "Month": "02",
    "Quarter": "Q1"
  },
  {
    "Month": "03",
    "Quarter": "Q1"
  },
  {
    "Month": "04",
    "Quarter": "Q2"
  },
  {
    "Month": "05",
    "Quarter": "Q2"
  },
  {
    "Month": "06",
    "Quarter": "Q2"
  },
  {
    "Month": "07",
    "Quarter": "Q3"
  },
  {
    "Month": "08",
    "Quarter": "Q3"
  },
  {
    "Month": "09",
    "Quarter": "Q3"
  },
  {
    "Month": "10",
    "Quarter": "Q4"
  },
  {
    "Month": "11",
    "Quarter": "Q4"
  },
  {
    "Month": "12",
    "Quarter": "Q4"
  }
]

4. Filter Quarter Array – next we use a Filter Array action to find the Array element where the Month Number is equal to the Month Number we calculated in Step 2. If we edit the Filter Array action in Advanced Mode, the expression we use is:

@equals(item()?['month'], outputs('MonthNum'))

5. Compose Quarter – the final step in the Flow is to use a compose action to extract the quarter number from the Array element we returned from the previous step. We do that by using the following expression:

body('Filter_Quarter_array')[0]?['Quarter']

Conclusion

This post should demonstrate that we can use different methods to achieve the same outcomes in Power Automate. If you’d like to download the Flows to test them for yourself then click the links below:

Change a User’s Business Unit and retain their Security Roles using Power Automate

I saw a tweet recently from Linn Zaw Win asking if it was possible to change a Users Business Unit without losing their Security Roles

If you’ve been following my blog you might be aware that I posted a solution to do this using North52 last year, but I wondered whether it would be possible to do this with Power Automate now.

The Setup

As we can’t run pre-validation Flows to retrieve a the prior value when we change a field in D365, we need to add another lookup to the Business Unit entity from the User entity. I’ve creatively called it “New Business Unit” and we’ll be using this as the trigger for our Flow. In my scenario, if you want to change the Business Unit of a User you would select the one you wish to migrate them to by updating this field

The Solution

1. When “New Business Unit” is updated – the Flow trigger is when the “New Business Unit” field is updated, and we set the filter expression to ensure it isn’t triggered when the field equals null (i.e. if the field is cleared)

2. List Existing Security Roles – next we use a List Records action to retrieve the current list of Security Roles applied to the User. We have to use a FetchXML query to retrieve the list Roles; when you apply a Security Role to a User it creates a record in the systemuserroles entity, so we can retrieve the list of applied Roles for a given User by querying across this entity with some link-entity parameters. The FetchXML query we use is:

<fetch>
  <entity name="role" >
    <attribute name="name" />
    <attribute name="businessunitid" />
    <attribute name="roleid" />
    <link-entity name="systemuserroles" from="roleid" to="roleid" >
      <link-entity name="systemuser" from="systemuserid" to="systemuserid" >
        <filter>
          <condition attribute="systemuserid" operator="eq" value="@{triggerOutputs()?['body/systemuserid']}" />
        </filter>
      </link-entity>
    </link-entity>
  </entity>
</fetch>

3. Initialize roleFilterCondition – we’re going to use the roles we returned above to find the same roles under the new business unit with another FetchXML query. Before we do that we need to initialize an empty string variable to hold the FetchXML conditions we’ll create

4. Apply to each Existing Role – for each role we returned in step 2 we will append a condition to the roleFilterCondition variable we created in Step 3 in the following format:

<condition attribute="name" operator="eq" value="@{items('Apply_to_each_Existing_Role')?['name']}" />

5. List Roles for New Business Unit – now that we’ve created our FetchXML conditions we’ll use a List Records step to retrieve the Security Roles for the new business unit that we picked for our User. The FetchXML we use for this query is:

<fetch>
  <entity name="role" >
    <attribute name="name" />
    <attribute name="businessunitid" />
    <attribute name="roleid" />
    <filter>
      <condition attribute="businessunitid" operator="eq" value="@{triggerOutputs()?['body/_rm365_newbusinessunit_value']}" />
      <filter type="or" >
        @{variables('roleFilterCondition')}
      </filter>
    </filter>
  </entity>
</fetch>

6. Update Business Unit – now that we’ve retrieved the new Security Roles we are going to be applying to the User we can change their Business Unit; to do this we use an Update Record action and set the Business Unit to the “New Business Unit” value. Changing the User’s Business Unit will remove their existing security roles.

7. Apply to each New Role – we use another Apply to Each control to iterate through the values we returned in the List Records action in Step 5 above. For each Role we use the Relate Records action. The parameters for the Relate Records action are:

  • Entity Name: Users
  • Item ID: The User value from the trigger
  • Relationship: systemuserroles_association
  • URL: the full resource address for the Security Role

8. Unrelate “New Business Unit” to clear field – the final step in the Flow is to use the Unrelate Records action to clear the “New Business Unit” field so it can be used again in future. The schema is the same as in the Relate Records action, but we’re triggering it on the New Business Unit record

Conclusion

This method will enable you to update Business Units for Users in your organisation and have their Security Roles persist. You could extend this functionality to Teams as well. It is worth noting that this won’t work for Security Roles that are created for specific Business Units, and it may encounter issues if you have duplicate role names, but I think the basic functionality is quite useful. Let me know if you think is handy for you in the comments below!