A common complaint I hear about Opportunity pipeline management in Dynamics 365 is that it’s difficult to use for revenue/income forecasting, as the system considers that you will receive the whole Estimated Revenue on the Estimated Close Date, whereas in reality it’s common for the revenue on a Won Opportunity to split into periodic draw downs (i.e. the client will be billed weekly, monthly, quarterly or annually).
I have created a solution previously with North52 to break the estimated revenue down over the life of the project, and I wanted to see if it would be possible to do the same with a Power Automate Flow.
Over the next few posts in this series I’ll show how I got this functionality working:
- The triggering Flow
- Creating Monthly Forecasts
- Creating Yearly Forecasts
- Creating Weekly Forecasts
- Creating Quarterly Forecasts
The Scenario
In my organisation we wanted to be able to get more detail into our revenue forecasting pipeline to increase the accuracy of it. The requirement was that we should be able to put in an estimated project end date as well as an opportunity Estimated Close Date; the time period between the Estimated Close Date and the Project End Date would be the project lifecycle.
From this time period we wanted to be able to break the Estimated Revenue down into Weekly, Monthly, Quarterly or Yearly revenue forecasts, and these forecasts should be based on the number of Working Days in the time period.
The Setup
In order to set up your environment to do create the revenue forecasts you need to add the following:
1. Opportunity Entity
- Add “Breakdown Type” option set field with the following options:
- Weekly
- Monthly
- Quarterly
- Yearly
- Add “Project End Date” date only field
- Add “DateDiff” whole number calculated field (see calculation below)


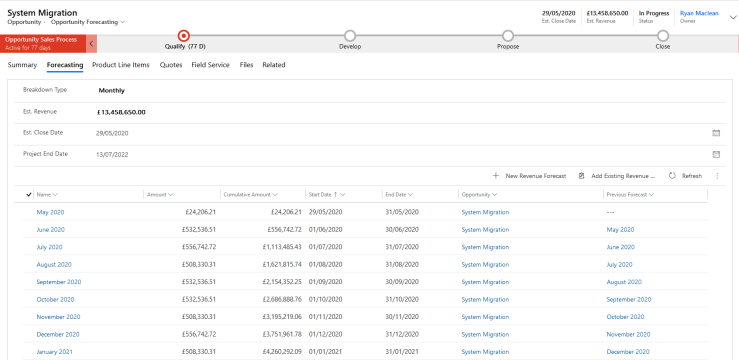
2. New “Revenue Forecast” Entity
Create a new entity in your environment called “Revenue Forecast” with the following fields:
- Name – a single line of text field for the name of the Forecast
- Amount – a currency field to hold the amount for the Forecast
- Cumulative Amount – a currency field
- Start Date – a date-only datetime field
- End Date – a date-only datetime field
- Opportunity – a lookup field to the Opportunity entity
- Previous Forecast – a hierarchical lookup field to the Revenue Forecast Entity

The Triggering Flow Solution

1. When Opportunity is Updated – The trigger uses the “When a Record is Created, Updated or Deleted” trigger from the Common Data Service (Current Environment) Connector. In this instance we’re using the Update trigger condition, and the filtering attributes that I used are the Estimated Revenue, Estimated Close Date, Breakdown Type and Project End Date fields.

2. List related Forecasts – the first step in the Flow is using a List Records action to retrieve any existing Revenue Forecasts for the Opportunity. As we’ll be generating new ones any time we change any of the filtering attributes, we need to remove the existing ones. We set the filter query using the following OData query:
_rm365_opportunity_value eq @{triggerOutputs()?['body/opportunityid']}

3. Apply to each Returned Forecast – we use an Apply to Each control to loop through the records returned from the List Records step above, and then we use a Delete Record action to delete the existing Revenue Forecast record

4. Compose fullDays – now that we’re starting from a clean slate we need to first calculate how many total days there are between the Estimated Close Date the Project End Date. To do this we use a compose step with the following expression:
add(div(sub(ticks(triggerOutputs()?['body/rm365_projectenddate']),ticks(triggerOutputs()?['body/estimatedclosedate'])),864000000000),1)
In my previous post regarding calculating working days I discussed the fact that we can’t do a simple “DateDiff” calculation in a Flow, rather we have to convert the dates to their ticks representation, then subtract the start date from the end date then divide the result by 864000000000 to convert the result to the number of days. Finally we add 1 to this result to give us the total number of whole days between the start date and end date, inclusive of the end date.

5. Initialize workDays – next we initialise an Integer variable called workDays and set it to the output from the previous step. We’ll subtract from this number to calculate the total number of working days in the time period.

6. WorkingDays calculation –
we use a Scope control to keep all of the decrement steps for calculating the amount of working days together and to keep the flow tidy

I discussed calculating working days in this previous post, however I’ve optimised the solution to make it more accurate.
6A. Decrement workDays by 2 for each Full Week – we know that in any given 7 day period there will be two weekend days, so we need to remove these from the total number of days returned above. The way we do this is to divide the total number of days value by 7, then multiply it by 2, and then subtract this result from the total number of days. Note that in the full days calculation above we had added one to the result, so we’re subtracting that from this value before we do the division.
mul(div(sub(outputs('Compose_fullDays'),1), 7), 2)

6B. Decrement workDays by 2 if EndDate DayofWeek is less than StartDate DayofWeek – Next we’re checking if the Project End Date is on an earlier Day of Week than the Estimated Close Date. (i.e. it starts on a Friday but ends on a Wednesday). In this case, we’ll have to account for an extra weekend so we remove it here.
if(less(sub(dayofweek(triggerOutputs()?['body/rm365_projectenddate']),dayofweek(triggerOutputs()?['body/estimatedclosedate'])),0),2,0)

6C. Decrement workDays by 1 if StartDate and EndDate are on the same weekend DayofWeek – If both the Estimated Close Date and Project End Date are on a Saturday or Sunday we need to subtract 1 from our working days calculation.
if(and(equals(dayofweek(triggerOutputs()?['body/estimatedclosedate']),dayofweek(triggerOutputs()?['body/rm365_projectenddate'])),or(equals(dayofweek(triggerOutputs()?['body/estimatedclosedate']),6),equals(dayofweek(triggerOutputs()?['body/estimatedclosedate']),0))),1,0)

6D. Decrement workDays by 1 if StartDate is Sun and EndDate is any other day – If the Estimated Close Date is a Sunday and the Project End Date is any other day then we need to subtract 1 from our working days calculation
if(and(equals(dayofweek(triggerOutputs()?['body/estimatedclosedate']),0),greater(sub(dayofweek(triggerOutputs()?['body/rm365_projectenddate']),dayofweek(triggerOutputs()?['body/estimatedclosedate'])),0)),1,0)

6E. Decrement workDays by 1 if EndDate is Saturday and StartDate is any other day – If the Project End Date is on a Saturday and the Estimated Close Date then we need to subtract one from our Working Days calculation.
if(and(not(equals(dayofweek(triggerOutputs()?['body/estimatedclosedate']),6)),equals(dayofweek(triggerOutputs()?['body/rm365_projectenddate']),6)),1,0)

I used an Excel workbook to verify these expressions against the networkdays formula. If you’d like a copy of the spreadsheet to do your own testing then download it by clicking here.
7. Compose revenuePerDay – now that we’ve calculated how many working days there are in our time period, the last step is to divide the Estimated Revenue by the amount of working days to calculate the amount of Revenue we will get for each working day in our project.
div(triggerOutputs()?['body/estimatedvalue'],variables('workDays'))

8. Switch on Breakdown Type – we use a Switch control to trigger one of the child flows we’ll create in the upcoming blog posts for creating Weekly/Monthly/Quarterly/Yearly breakdowns.
The inputs for the Child Flows ask for:
- Loops – we use the output from our DateDiff calculated field, and we’ll use this to work out how many Revenue Forecast records we will be creating
- Estimated Closed Date
- Project End Date
- Revenue Per Day
- OpportunityID – The GUID for our triggering record, we’ll use this to set the Opportunity lookup field on the Revenue Forecast records we will create
- Estimated Revenue

Conclusion
This post provides the groundwork for the revenue forecasting solution, and is useful for accurately calculating the number of working days in any given time period. I think it showcases some relatively complex expressions, so at the very least I hope it demonstrates how you might be able to use the expressions to carry out complicated functions.
In the next post in this series I’ll show how to create Monthly Revenue Forecasts for an Opportunity. If you’ve got any questions in the meantime please reach out.

[…] I optimised the solution to calculate working days to make it more accurate, you can read more in this blog post […]
LikeLike
[…] Dynamics 365 Opportunity Revenue Forecasting with Power Automate – Part 1 […]
LikeLike
[…] my last post I explored how to create a structure and a triggering flow to create Opportunity Revenue Forecasts. […]
LikeLike
[…] my last post I explored how to create a structure and a triggering flow to create Opportunity Revenue Forecasts. […]
LikeLike
[…] my last post I explored how to create a structure and a triggering flow to create Opportunity Revenue Forecasts. […]
LikeLike
Hi Ryan,
Do you use one or more triggers in this flow?
LikeLike