Better Integration Between Dynamics 365 and SharePoint – Part 2

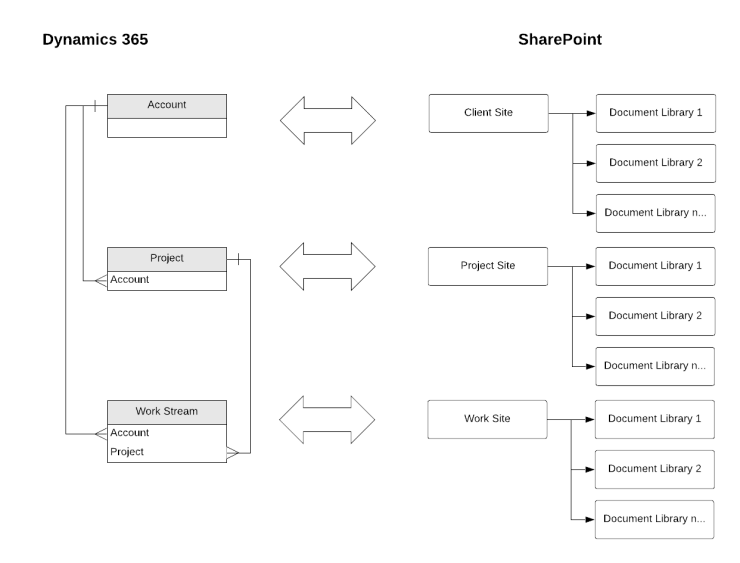
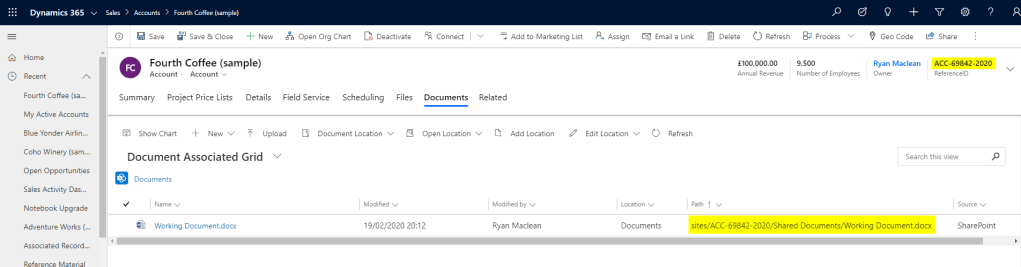
In my previous post I discussed how to improve the integration between Dynamics 365 and SharePoint by creating a site collection for each record, instead of using the OOTB integration.

Now that you have a site, you might give some thought as to how you will structure your data; typically SharePoint best practice would tend to suggest you should use metadata instead of folders, but if you do need to segregate information then the recommendation would be to use Document Libraries.

In this post I will demonstrate how you can add Document Libraries to the SharePoint site for a record and have it visualised on the Dynamics 365 record. There are two approaches for this:

  1. Triggering the creation of a Document Library from the Dynamics 365 record
  2. Creating the Document Library directly in SharePoint and syncing with D365

For each method, I have created a Power Automate Flow and I’ll run through the key features below.

Creating A Document Library from Dynamics 365

1. When a Record is Selected – the first step is to use the “Common Data Service – When a Record is Selected” trigger. This trigger is only available in the “old” CDS connector (see this great post from Sara Lagerquist for a comparison between the CDS connectors). In order to be able to use the When a Record is Selected trigger you have to ensure the Flow is not in a solution, as it will not be able to select otherwise. One of the best things about using this trigger is that you can also request input values from Users, so in this case we’re going to ask the Users to input their desired Document Library name

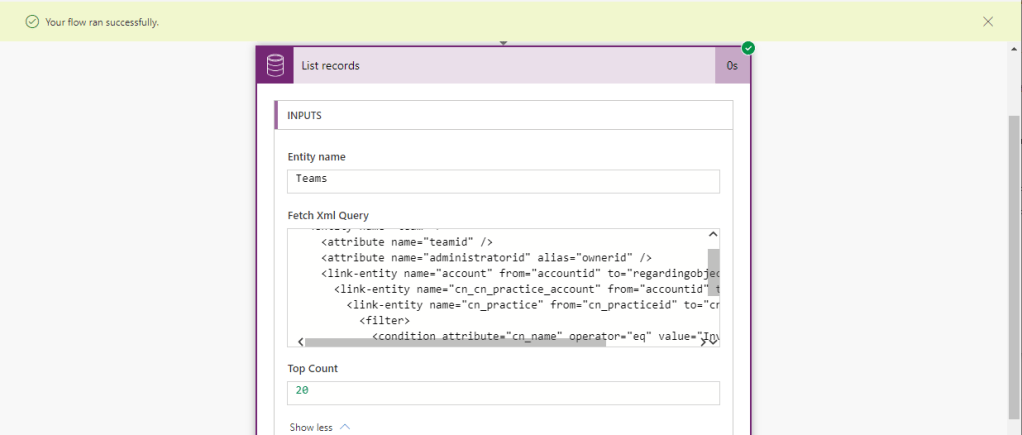
2. Get Related SharePoint Site – next we’ll use a List Records action to get the related SharePoint site. In this step we’ll use an OData filter to look for sites where the Absolute URL matches the SharePoint site URL for our Account

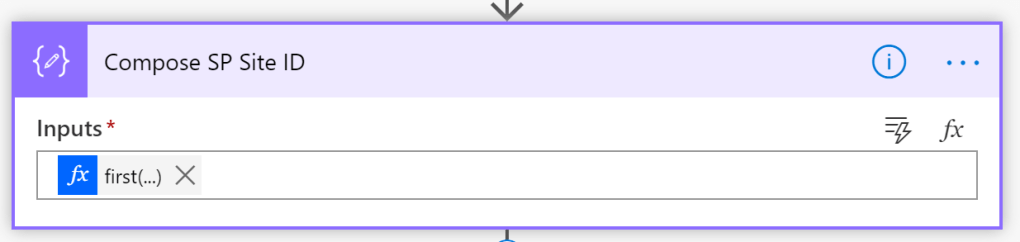
3. Compose SharePoint Site ID – we will use a Compose step to extract the SharePoint site ID from the SharePoint site record we’ve returned in the previous step. As we’ll only have one SharePoint site per record, we don’t need to use an Apply to Each control, rather we can use a First expression to extract the specific field value. The expression I’ve used is:

first(outputs('Get_Related_SP_Site')?['body/value'])?['sharepointsiteid']

4. Create Document Library – we will use the “Send HTTP Request to SharePoint” action to create a Document Library on our Account site. The Send HTTP Request action allows you to leverage the full SharePoint REST API to do actions that aren’t available with the OOTB connector. If you’re not aware, Microsoft have some great resources available to help you understand the REST API, so I’m just using the instructions available here to create a Document Library. (This does say working with Lists, but Document Libraries are really just a fancy kind of list)

There are a few aspects to this action we need to fill in:

  1. Site Address – we will use the Site Address from the custom field on our Account record
  2. Method – as we’re creating a Document Library we’re going to be using the POST method
  3. Headers – we will be specifying that we are sending a JSON request (content-type) and expect a JSON back (accept)
  4. Body – Microsoft have helpfully outlined the key elements of the body JSON at the link. They key values we need to specify are:
    1. BaseTemplate: 101 – this signifies that this is a Document Library
    2. Title – this will be the value that is input in our trigger

The Header JSON is:

{
  "Accept": "application/json;odata=verbose",
  "Content-Type": "application/json;odata=verbose"
}

The Body JSON is:

{
 "__metadata": {
 "type": "SP.List"},
 "BaseTemplate": 101, 
 "ContentTypesEnabled": false,
 "Description": "Created by Flow",
 "Title": "@{triggerBody()['text']}" 
}

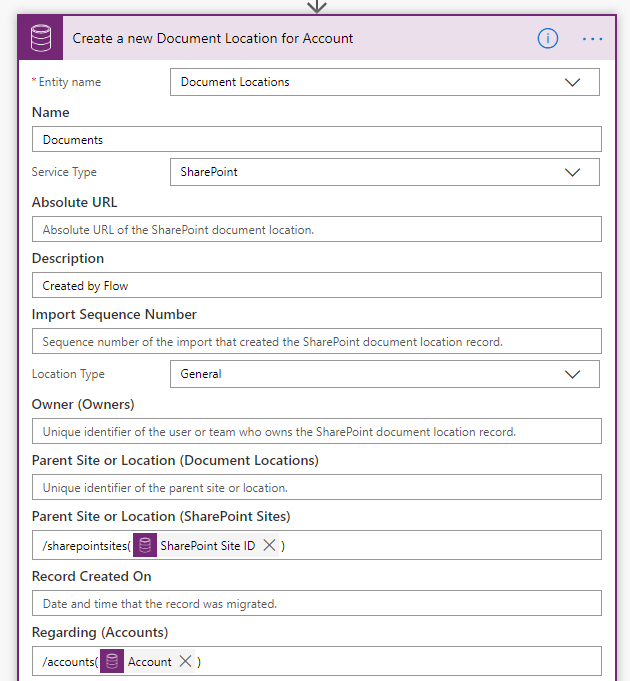
5. Create a Document Location – the final step is to use a Create a Record action to create a Document Location record in Dynamics 365. We need to input the following information:

  1. Name – we will use the input value from the trigger
  2. Service Type Value – set this to SharePoint
  3. Relative URL – we will use the input value from the trigger
  4. Parent Site or Location ID – we will use the output from the Compose step at Step 3 above
  5. Parent Site or Location Type – set this to SharePointSites
  6. Regarding Object ID – we will set this to the Account ID from the trigger
  7. Regarding Object Type – set this to Accounts

When this is all done, we can use the Flow “on-demand” to create Document Libraries and an associated Dynamics 365 Document Location on any Accounts in our organisation that have a SharePoint site.

Note: I have not added any error handling to this Flow, but you may wish to include some guard conditions to ensure you don’t try and create document libraries against records with no associated SharePoint site

CREATING DOCUMENT LIBRARY FROM SharePoint and Syncing to Dynamics 365

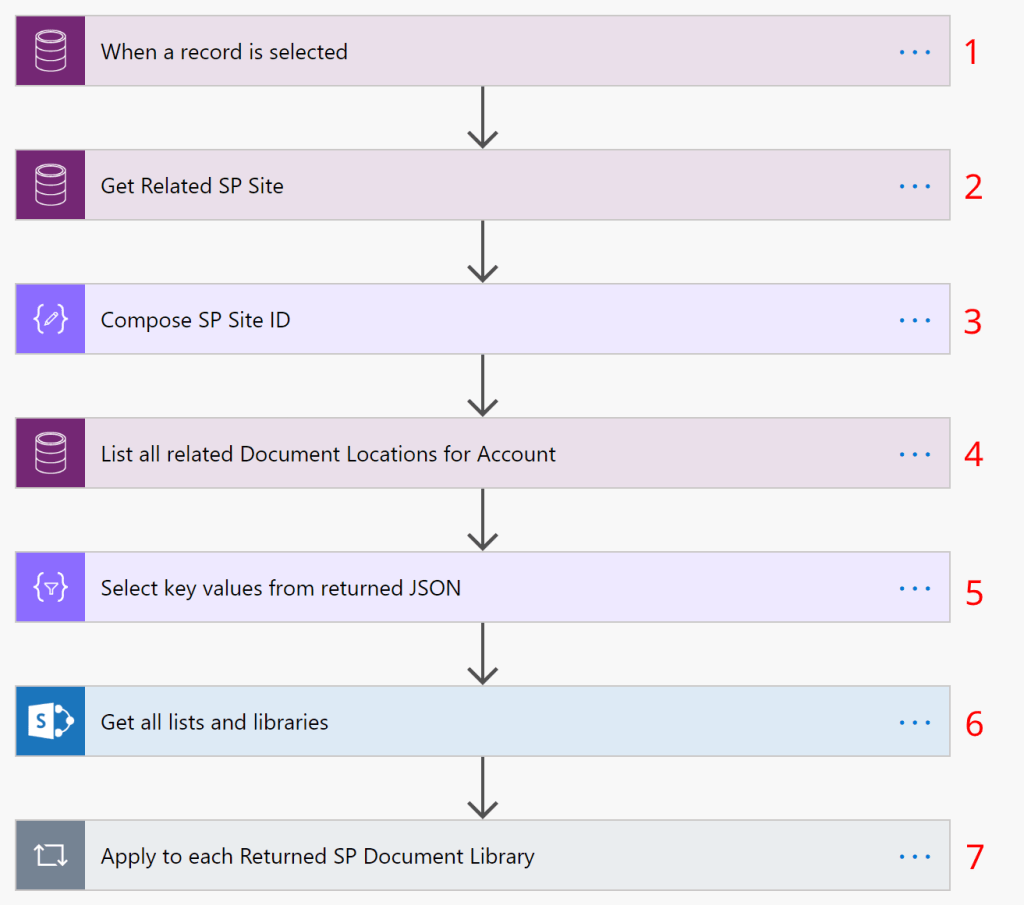
Steps 1 – 3 are the exact same as Steps 1-3 in the previous Flow (i.e. use the When a Record is Selected Trigger (though we don’t need an input value for this Flow), then List Records to get the associated SharePoint Site record, then a Compose step to extract the SharePoint Site ID.

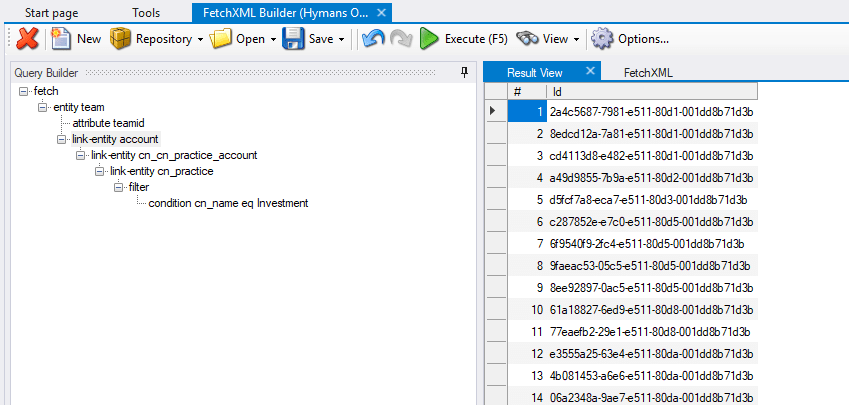
4. List all related Document Locations for Account – next we will use a List Records step to find all Document Locations in Dynamics 365 related to the SharePoint site record for the Account

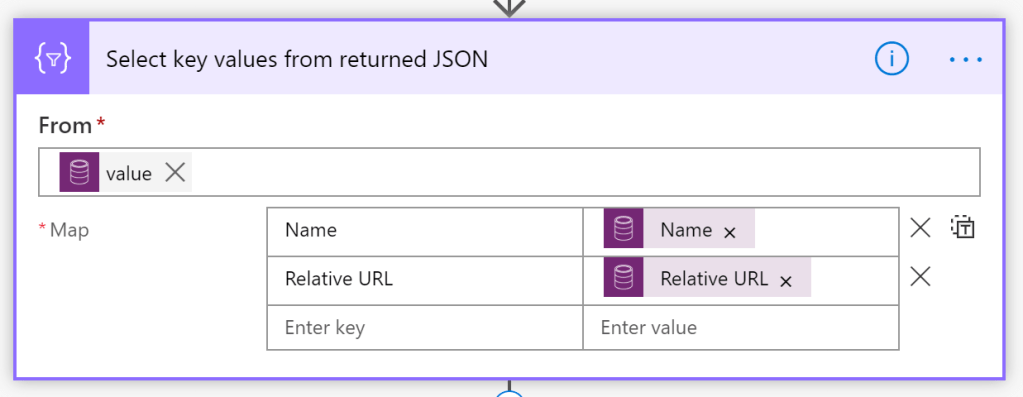
5. Select key values from returned JSON – in order to remove the noisiness from the returned JSON for the List Records step above we will use a Select action to extract the following values for each Document Location:

  1. Name
  2. Relative URL
  3. ID

6. Get all Lists and Libraries – we’ll use the standard Get all Lists and Libraries action to return a list of the Document Libraries on the site. For the Site Address we’ll input the SharePoint Site URL from the custom field on our Account entity

7. Apply to each returned SP Document Library – for each Document Library that is returned in the step above, we’ll loop through them to check if they are already in Dynamics 365 and, if not, we’ll create a Document Location for them

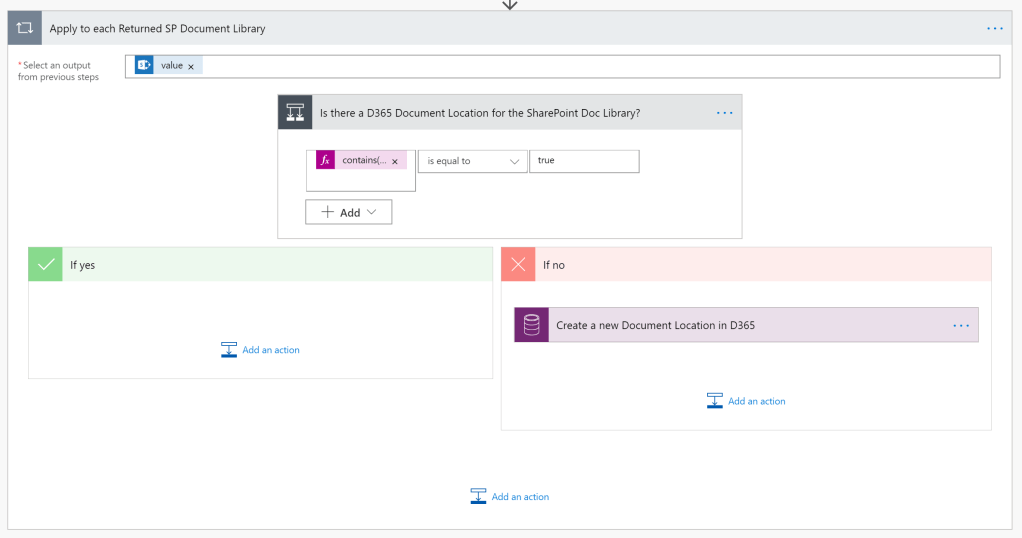
7A – Is there a D365 Document Location for the SharePoint Doc Library? – we’re using a condition control here to check if the SharePoint Document Library appears in the list of D365 Document Libraries with a Contains expression. The expression I’ve used is:

contains(toLower(string(body('Select_key_values_from_returned_JSON'))),toLower(items('Apply_to_each_Returned_SP_Document_Library')?['DisplayName']))

7B – If No then Create a New Document Location in D365 – if there is not a D365 Document Location existing for the SharePoint Document Library then we’ll use a Create a new Record action to create one. We need to input the following information:

  1. Name – we will use the DisplayName from the returned SharePoint Document Library
  2. Service Type Value – set this to SharePoint
  3. Relative URL – we will use the DisplayName from the returned SharePoint Document Library
  4. Parent Site or Location ID – we will use the output from the Compose step at Step 3 above
  5. Parent Site or Location Type – set this to SharePointSites
  6. Regarding Object ID – we will set this to the Account ID from the trigger
  7. Regarding Object Type – set this to Accounts

Note: if a User inputs any invalid characters in the title of the Document Library on create, or if they change the name of the Document Library after it is created, then this Flow may not execute perfectly. In those situations we’d have to include workarounds with the “Send HTTP Request to SharePoint” action and utilise the REST API

Conclusion

With the two Flows I have outlined above we can enable Users to add Document Libraries to their SharePoint sites from either the Dynamics 365 record or the SharePoint site, and be able to interact with them directly from the Dynamics 365 record. From my own experience, I know that this kind of flexibility is appreciated by Users.

Ten Regex Expressions To Use With Forms Pro

If you’ve been using Forms Pro to create surveys then you should be aware that you can do custom validation on fields with Regular Expressions (regex). My friend Megan Walker blogged about this recently, showing how easy it is to add the custom formatting checks to a field on your survey. Megan and I were discussing this functionality and, as I’m a massive geek, she asked if we could work together to come up with ten different custom expressions that you could use in a Forms Pro survey; we came up with the following list:

  1. Phone Numbers
  2. Website address
  3. Twitter handle
  4. Zip code (5 digits)
  5. UK Postcode
  6. National Insurance Number (UK)
  7. Social Security Number (USA)
  8. Vehicle Registration (UK)
  9. Date of birth (both dd/mm/yyyy & mm/dd/yyyy)
  10. Time (24 hour & 12 hour AM/PM formats)

I’ll go through each of these in turn below to show you how they work. I’ll include a copy of the expression, an explanation of the key rules that make up the query, a link to Regex101 for testing the query, and a visual overview of how the query works.

UK Phone Number

(\s*\(?(0|\+44)(\s*|-)\d{4}\)?(\s*|-)\d{3}(\s*|-)\d{3}\s*)|(\s*\(?(0|\+44)(\s*|-)\d{3}\)?(\s*|-)\d{3}(\s*|-)\d{4}\s*)|(\s*\(?(0|\+44)(\s*|-)\d{2}\)?(\s*|-)\d{4}(\s*|-)\d{4}\s*)|(\s*(7|8)(\d{7}|\d{3}(\-|\s{1})\d{4})\s*)|(\s*\(?(0|\+44)(\s*|-)\d{3}\s\d{2}\)?(\s*|-)\d{4,5}\s*)

In order to construct any regex query you have to understand the rules of the information you’re trying to validate. Luckily for me, Wikipedia has a great page about UK telephone numbers. Some of the key rules we need to be aware of are:

  1. The numbers can start with +44 (the international dialling code) or 0
  2. The telephone numbers can be prefixed with a 3, 4 or 5 digit area code
  3. 3 digit area code numbers have a format of 3-4-4 (i.e. 000 0000 0000)
  4. 4 digit area codes have a 4-3-4 format (i.e. 0000 000 0000)
  5. 5 digit area codes have either a 5-6 or 5-3-3 format (i.e. 00000 000000 or 00000 000 000)
  6. Area codes may or may not be enclosed in brackets
  7. There are some special case numbers such as Sedbergh and Brampton which have unique area codes (4-2 format area code, followed by 5 or 4 numbers respectively)

As we know the rules, this makes the construction of the regex query much easier, we can take the rules in turn and construct a query for them. In order to demonstrate the query in action I have created a sample on Regex101 that you can use for testing, see https://regex101.com/r/ACqAiu/2

Website Address

^(http:\/\/www\.|https:\/\/www\.|http:\/\/|https:\/\/|www.)[a-z0-9]+([\-\.]{1}[a-z0-9]+)*\.[a-z]{2,5}(:[0-9]{1,5})?(\/.*)?$

the key rules we need to consider for a website address are:

  1. The address may begin with http://, https:// or www.
  2. After the protocol, the address may optionally begin with www.
  3. The web domain may use letters, numbers or hyphens
  4. Hyphens cannot be used at the beginning or end of the domain
  5. The web address typically ends with a top-level domain that is between 2-5 letters (i.e. .com, .net, .gov, etc.)

You can test this expression on Regex101 by clicking here

Twitter Handle

[\@][A-Za-z0-9_]{1,15}$

Twitter usernames have some pretty simple rules:

  1. the username begins with an @ symbol
  2. the username cannot be longer than 15 characters
  3. the username can only be comprised of alphanumeric digits or an underscore

You can test this expression on Regex101 by clicking here

US Zipcode

^[0-9]{5}(?:-[0-9]{4})?$

US Zip Codes are really straightforward, the key rules are:

  1. It can be comprised of 5 numbers
  2. It may optionally also have a 4 digit suffix following a hyphen for the ZIP+4 format

You can test this expression on Regex101 by clicking here

UK PostCode

^(([A-Z]{1,2}[0-9][A-Z0-9]?|ASCN|STHL|TDCU|BBND|[BFS]IQQ|PCRN|TKCA) ?[0-9][A-Z]{2}|BFPO ?[0-9]{1,4}|(KY[0-9]|MSR|VG|AI)[ -]?[0-9]{4}|[A-Z]{2} ?[0-9]{2}|GE ?CX|GIR ?0A{2}|SAN ?TA1)$

The Wikipedia article on UK Postcodes has a great section on validation that covers all of the key rules, and provides the regex that I have inlcuded above. I’d recommend reading it to get an overview of how the validation works.

You can test this expression on Regex101 by clicking here

UK National Insurance Number

^[A-CEGHJ-PR-TW-Z]{2}[0-9]{6}[A-DFM]{1}$

UK National Insurance numbers have some key rules:

  1. They are formatted as two prefix letters, six digits and one suffix letter
  2. Neither of the first two letters can be D, F, I, Q, U or V
  3. The suffix letter can be A, B, C, D, F or M

You can test this expression on Regex101 by clicking here

US SOcial Security Number

^\d{3}(\s*|-)\d{2}(\s*|-)\d{4}$

The rules for US Social Security numbers are:

  1. 9 digits in total
  2. May be in a 3-2-4 format (i.e. 000-00-0000)
  3. The delimiter between the sections of the number may be a hyphen or a white space

You can test this expression on Regex101 by clicking here

UK Vehicle Registration

^([A-Z]{3}\s?(\d{3}|\d{2}|d{1})\s?[A-Z])|([A-Z]\s?(\d{3}|\d{2}|\d{1})\s?[A-Z]{3})|(([A-HK-PRSVWY][A-HJ-PR-Y])\s?([0][2-9]|[1-9][0-9])\s?[A-HJ-PR-Z]{3})|([A-Z]{3}\s?(\d{4})\s?)$

There are a number of rules regarding UK Vehicle Registration numbers, and there is a great gist on GitHub by Daniel Bradley that covers the rules so I’d recommend head there to read about it.

You can test this expression on Regex101 by clicking here

Date of Birth

^(((19|20)\d\d[- \/.](0[1-9]|1[012])[- \/.](0[1-9]|[12][0-9]|3[01]))|((0[1-9]|1[012])[- \/.](0[1-9]|[12][0-9]|3[01])[- \/.](19|20)\d\d)|((0[1-9]|[12][0-9]|3[01])[- \/.](0[1-9]|1[012])[- \/.](19|20)\d\d))$

For a date of birth we want to validate the following rules:

  1. The date may be input in the DD/MM/YYYY, MM/DD/YYYY or YYYY/MM/DD format
  2. The elements of the date may be separated by a forward slash (/), period (.), hyphen (-) or space

You can test this expression on Regex101 by clicking here

TIME – 24 hour Format

^([0-1]?[0-9]|2[0-4]):([0-5][0-9])(:[0-5][0-9])?$

Hopefully the rules around time are obvious, but you can have any time from 00:00 to 24:00, with the hours and minutes separated by a colon. You can optionally include the seconds which will also be separated from the minutes by a colon

You can test this expression on Regex101 by clicking here

TIME – 12 HOUR FORMAT

^([1-9]|1[012]):(0[0-9]|[1-5][0-9])\s?(am|AM|pm|PM)$

Time in a 12 hour format can be anytime from 12:00am to 11:59pm, and may be suffixed with am or pm, which may be in upper or lower case

You can test this expression on Regex101 by clicking here

Conclusion

Hopefully the examples above will give you some ideas for how you can use regular expressions in your own surveys. The examples are intended as a guide, so please test them before implementing them in any production environment. If I have made any glaring errors then please let me know in the comments or by reaching out to me on Twitter or LinkedIn.

If you’d like to know more about Forms Pro then please subscribe to Megan’s blog, follow her on Twitter, watch her YouTube channel or enrol in her excellent online training course.

Better Integration between Dynamics 365 and SharePoint using Power Automate — Part 1

If you’ve used the standard OOTB connection between Dynamics 365 and SharePoint then I’m sure, like me, you’ll have found your share of frustrations.

The technical functionality is great, allowing you to see your documents stored in SharePoint in a subgrid on the related Dynamics 365 record, however the standard implementation will probably make your SharePoint admins cry because it uses a single SharePoint Site, with a Document Library for each Entity, and a Folder for each record.

Whilst this approach sort of makes sense; at scale it becomes pretty unmanageable and it runs counter to any recognised SharePoint best practices. In my organisation we wanted to have a SharePoint site per record which would allow us to control security much more robustly. Peter Baddeley has blogged about similar issues before and I’d highly recommend reading his posts about this.

The Scenario

In my organisation we have Client SharePoint sites, linked to the Account record in Dynamics 365. Each of these SharePoint sites can have one or many Document Libraries depending upon the requirements of the Client. We then have a custom entity for Projects, and each Project has a SharePoint Site with one or many Document Libraries. Finally, each Project may have one or many Work Streams, and each of the Work Streams may have one or many Document Libraries

The relationships between the entities and the two systems can be visualised as below:

The Setup

As indicated above, in my scenario we have some custom entities:

  • Project
    • Lookup to Account entity
  • Work Stream
    • Lookup to Account entity
    • Lookup to Project entity

Note that while there is a parent:child relationship between Accounts and Projects, and Projects and Work Sites, this doesn’t have to be reflected in SharePoint, thus we can avoid getting into nested site structures in SharePoint and take advantage of modern functionality like Hub Sites.

As part of my demonstration I’ll also add a few custom fields to my Account entity:

  • Create SP Site – two option field I’ll use to trigger my Flow to run
  • Reference ID – An autonumber field to generate a unique ID for each Account, that we’ll use for the new site URL
  • SP Site URL – a field to hold the URL for the site we’re creating, which we’ll use in Part 2 and Part 3 of this series

A key part of the setup is also to ensure that you’ve set up SharePoint integration and enabled Document Management on the entities we’ll be using – see the Microsoft documentation for more info on how to do this. As we’re creating a custom document management structure, you might want to avoid the default document location logic from firing – Alex Shlega covered this in his blog about custom folder structures for SharePoint integration.

The Solution

Now that we have a clear understanding of our scenario, we need to create a custom document management structure using a Power Automate flow. Before we jump into this you should be aware that the standard SharePoint Flow connector doesn’t allow you to create SharePoint Site collections, it will only allow you to create subsites. To work around this restriction we’re going to use an Azure Automation runbook to execute some PowerShell.

Azure Automation

I had written a lengthy explanation of how to create an Azure Automation runbook that we could call from a Flow, but then I found this post from Planet Technologies that explains so straightforwardly how to do this that I’d rather just link you to their blog. If you’ve never created an Azure Automation runbook, or you feel intimidated by the idea of PowerShell then I can assure you that you have no reason to worry. The steps in this blog are super easy to follow!

In my Azure Automation Runbook I’ve added a step using the Register-PnPHubSite cmdlet to register my Client (Account) site as a Hub site. By doing this I can then associate my Project and/or Work sites to this Hub using the Add-PnPHubSiteAssociation cmdlet, without having to implement a nested site structure.

The Flow

1. When a Record is Updated – for the trigger I’m using the “When a Record is Created, Updated or Deleted” trigger from the Common Data Service (Current Environment) Connector. In this instance I’m using the Update trigger condition, to check when the new “Create SP Site” field I created is set to “Yes”. Note below that I’ve set the Filtering attributes to this field, and set a Filter expression to only trigger the flow when the value of this field is True

2. List the Default SP sites to get the Base URL – next I am using a List Records step with a FetchXML query to retrieve the Default SharePoint site URL. When you set up your integration with SharePoint you would have specified a site, and this is listed in Dynamics 365 as a default site, so we can retrieve this easily. The FetchXML query I used is:

<fetch version="1.0" output-format="xml-platform" mapping="logical" distinct="false">
  <entity name="sharepointsite">
    <attribute name="name" />
    <attribute name="parentsite" />
    <attribute name="relativeurl" />
    <attribute name="absoluteurl" />
    <attribute name="validationstatus" />
    <attribute name="isdefault" />
    <order attribute="name" descending="false" />
    <filter type="and">
      <condition attribute="isdefault" operator="eq" value="1" />
    </filter>
  </entity>
</fetch>

3. Compose AbsoluteURL – As I’m only returning a single record in the List Records step above, I will use a Compose action to retrieve the Absolute URL field value, rather than having to use an Apply to Each step. To do this, we use a First expression to retrieve the first returned value, then we’ll interrogate the JSON to get the value we want. The expression I used is:

first(outputs('List_the_Default_SP_sites_to_get_the_Base_URL')?['body/value'])?['absoluteurl']

4. Initialise SiteURL – next we’ll create a string variable for the Site URL of the new SharePoint site we’re going to create. To do this, we’ll use the output of the compose step above, append it with the value “/sites/” (as the new site will be within the sites managed path in SharePoint) and then complete it with the autonumber value from the new Reference ID field we created.

Note: if you want to use the name of your record in D365 for the URL you might need to strip out any “dangerous” characters for the URL. In this case you could follow the great advice from AlanPS1 on his blog for stripping unwanted characters

5. Create Azure Automation Job – now that we have our Site URL for the new site we want to create we’re going to use the Create Job action from the Azure Automation connector. In this action you’ll specify the Subscription, Resource Group, Automation Account and Runbook Name we created above. This will then bring up the Input parameters you specified in your runbook. In my case I just need the Site URL and the Account Name for my site title. Note that I’ve set “Wait for Job” to Yes, this is important to ensure the Job is completed before the action is marked as complete in your flow.

6. Create a new SP Site record – after the Azure Automation has done it’s work and created the SharePoint site we’re going to create a SharePoint Site record in Dynamics 365 for it. With this SharePoint Site record we will set the Absolute URL to the SiteURL we created earlier.

7. Create a new Document Location for Account – the final step in the Flow is create a Document Location record in D365 for the Account so we can actually see the SharePoint site and the documents stored there when we look at the Account record in D365. For the purposes of this demo I’m just creating a SharePoint Document Location for the default Documents document library that is created when you create a SharePoint site, so I know that the Name is “Documents” and the Relative URL is “shared documents”. If you were using a Template that created multiple document libraries you could use the SharePoint “Get all Lists and Libraries” action to retrieve them all then create a new Document Location for each Library that is returned.

One thing to note here is that when I’m setting the Lookup fields I have to put them in the format “/PluralofEntityName(GUID)”. This is due to a known bug with the Common Data Service (Current Environment) connector – see this blog by Sara Lagerquist for more information on this issue.

Conclusion

In this blog post I wanted to demonstrate how easy it can be to create an advanced custom integration between Dynamics 365 and SharePoint, and how accessible it is even to non-developers like me now that we have such advanced functionality available to us in Power Automate flows and Azure Automation runbooks.

Implementing a custom integration allows you to implement proper security management, and makes the solution much more scalable for proper document management functionality. In the next blog I’ll show you how to create new SharePoint Document Libraries from within Dynamics 365.

If you think this is useful I’d love to get your thoughts on it, please drop a comment below or reach out to me on Twitter or LinkedIn!

Exchange Rate Conversion with Power Automate

Many of us will work in organisations that have a global presence and therefore may have a need to know the value of something in a local currency. There isn’t any out of the box way to convert a base currency to another currency in Power Automate, so I wanted to see how easy it would be to configure.

The Solution

For the purposes of this blog I’m going to configure a simple manually triggered flow that will take a number input for a value to convert, and the base currency from which we are converting, and it will return this value at it’s current exchange rate in 10 different currencies. There are two parts to this solution:

  1. Configure a Custom Connector to retrieve current exchange rates
  2. Configure the Flow to output the converted value

Configuring a Custom Connector

As there is no out-of-the-box connector to do exchange rate conversion, we need to create our own. If you’ve not created a custom connector before, it is really straightforward; you just need an API that you can access with the appropriate authorisation and then it is a really simple process. Joe Unwin, AKA Flow Joe, covered the steps to creating a custom connector on his blog here.

As I needed an API to access, a bit of google-fu led me to this free Exchange Rates API, which really handily allows you to request the rates against a specific currency by setting the base parameter in the requet:

So, how do we set up this Custom Connector? There are basically 2 main steps for this one, as there is no authentication required.

Step 1 – input the host URL in the General Information section of the Custom Connector:

Step 2 – as we saw above, the Open Exchange Rates API allows us to request the latest rates by specifying a base currency parameter. To add this to our custom connector we simply add a new Action in the Definition section, then under the request heading we click Import from Sample and paste the URL with the parameter into the flyout window and specify it as a GET Request. To show just how easy it is, watch the gif below:

Now that we have the custom connector created, we’re ready to create the Flow

COnverting Values with a Flow

This Flow is pretty straightforward so I’ll run through each step in turn:

1. Manually trigger a Flow – for the purposes of this demo I’m using a manual trigger, and I’m specifying two inputs: the value to convert and the base currency we’re converting from. Of course, if you were implementing this in your environment any trigger could be used, as long as you’re providing these input values

2. Initialize RateConversion Array variable – In this array I want to specify the Currency name, Currency Code (ISO 4217 code) and the Locale (BCP 47 Code). The Currency Code is used to identify the exchange rate we’ll be converting to in the returned results, while the Locale will be used as part of a formatNumber expression later in the Flow. The Array I’m using is:

[
  {
    "Currency Name": "US Dollar",
    "Currency Code": "USD",
    "Locale": "en-US"
  },
  {
    "Currency Name": "British Pound Stirling",
    "Currency Code": "GBP",
    "Locale": "en-GB"
  },
  {
    "Currency Name": "Japanese Yen",
    "Currency Code": "JPY",
    "Locale": "ja-JP"
  },
  {
    "Currency Name": "Euro",
    "Currency Code": "EUR",
    "Locale": "fr-FR"
  },
  {
    "Currency Name": "Swedish Krona",
    "Currency Code": "SEK",
    "Locale": "sv-SE"
  },
  {
    "Currency Name": "Australian Dollar",
    "Currency Code": "AUD",
    "Locale": "en-AU"
  },
  {
    "Currency Name": "Canadian Dollar",
    "Currency Code": "CAD",
    "Locale": "en-CA"
  },
  {
    "Currency Name": "New Zealand Dollar",
    "Currency Code": "NZD",
    "Locale": "en-NZ"
  },
  {
    "Currency Name": "South African Rand",
    "Currency Code": "ZAR",
    "Locale": "en-ZA"
  },
  {
    "Currency Name": "Brazilian Real",
    "Currency Code": "BRL",
    "Locale": "pt-BR"
  }
]

3. Parse RateConversion Array – in this step we’re using a Parse JSON action to enable us to use the elements from the array we create above later in the Flow. The Schema for this step is:

{
    "type": "array",
    "items": {
        "type": "object",
        "properties": {
            "Currency Name": {
                "type": "string"
            },
            "Currency Code": {
                "type": "string"
            },
            "Locale": {
                "type": "string"
            }
        },
        "required": [
            "Currency Name",
            "Currency Code",
            "Locale"
        ]
    }
}

4. Retrieve Latest Rates – in this step we’re going to use our Custom Connector that we created earlier to retrieve the latest rates. As you can see, because we specified a “base” parameter, it is asking us for that input in the action. We’re using the “Base Currency” input from our trigger in this field

The output from this step looks like:

{ 
   "rates":{ 
      "CAD":1.7211925099,
      "HKD":10.0868447976,
      "ISK":164.0533917057,
      "PHP":65.6558566704,
      "DKK":8.8888624521,
      "HUF":403.8758952152,
      "CZK":29.5962311737,
      "GBP":1.0,
      "RON":5.670251493,
      "SEK":12.4872112113,
      "IDR":17741.190606486,
      "INR":92.5961835875,
      "BRL":5.6254015085,
      "RUB":81.7923338647,
      "HRK":8.871850389,
      "JPY":142.7942611054,
      "THB":40.3863998668,
      "CHF":1.2663874943,
      "EUR":1.1896547622,
      "MYR":5.3701015965,
      "BGN":2.3267267839,
      "TRY":7.8425610888,
      "CNY":9.0500606724,
      "NOK":11.9494872588,
      "NZD":2.0024268957,
      "ZAR":19.1850864879,
      "USD":1.2983892075,
      "MXN":24.1825882129,
      "SGD":1.7989959314,
      "AUD":1.9242665778,
      "ILS":4.4403863999,
      "KRW":1532.2753336982,
      "PLN":5.062456875
   },
   "base":"GBP",
   "date":"2020-02-12"
}

5. Initialize ConvertedRates string variable – In this step we’re just creating an empty string variable that we’ll add to when we loop through the Array we created in step 2 to convert our values

6. For each requested Rate – We’re going to loop through each of the Rates in the Array we created in Step 2 to convert them

6A. Check that there is a value returned for the requested Rate – this condition is to allow for some error handling in the event that the rate we’ve requested in our Array isn’t returned in the results from our Custom Connector. The expression we’re using is

body('Retrieve_Latest_Rates')?['rates']?[items('For_Each_Requested_Rate')['Currency Code']]

6B. Append No Conversion Available to String – If the condition above returns a negative result then we’ll use an Append to String Variable action to append a note that there is No Conversion Available for the requested rate. This ensures consistency of results

6C – Append Converted Value to String – if the condition at step 6A returns a positive result then we want to multiply the requested value from our trigger by the exchange rate returned, then format the results in the local currency. The expression we use to do this is:

formatnumber(mul(triggerBody()['number'], float(body('Retrieve_Latest_Rates')?['rates']?[items('For_Each_Requested_Rate')['Currency Code']])), 'C', items('For_Each_Requested_Rate')['Locale'])

Lets break this down from inside out:

float(
body('Retrieve_Latest_Rates')?['rates']?[items('For_Each_Requested_Rate')['Currency Code']])

For this part of the expression, we’re interrogating the JSON that is returned from our custom connector in Step 4 above to find an exchange rate. We’re using the Currency Code for the current item in our Array to find the related Exchange Rate. We then need to convert this string to a Float value using the Float expression so we can use it in our multiplication

mul(triggerBody()['number'],[FLOAT_VALUE_FROM_ABOVE])

Now that we’ve returned a Float value, we’re going to use a mul expression to multiply the number we input in our trigger by this value.

formatnumber([MULTIPLICATION_RESULT], 'C', items('For_Each_Requested_Rate')['Locale'])

The final step is to take the value that we’ve returned from our multiplication and format it in a manner that’s representative of the currency we’re displaying. The formatNumber expression allows us to specify that the number we’re working with is a Currency, and the Locale that we retrieve from the array specifies exactly what currency the value is.

7. Respond to a PowerApp or Flow – for this demo I’m assuming we’d want to return the string of converted values to a PowerApp or Flow, but of course you could use this output for any appropriate purpose

The output of the Flow for an input of 10000 GBP looks like:

US Dollar: $12,983.89
British Pound Stirling: £10,000.00
Japanese Yen: ¥1,427,943
Euro: 11 896,55 €
Swedish Krona: 124 872,11 kr
Australian Dollar: $19,242.67
Canadian Dollar: $17,211.93
New Zealand Dollar: $20,024.27
South African Rand: R191 850,86
Brazilian Real: R$ 56.254,02

Conclusion

This is a relatively simple Flow that shows how easy it is to configure a Custom Connector and use an open API in the context of a Flow. Converting values to other currencies could be useful in a number of scenarios, in particular if you are using multiple currencies in your Dynamics 365 environment where keeping the exchange rates up to date is vitally important.

See the Flow in action below:

Quick Tip: Resolving Error Retrieving Teams via Fetchxml with List Records Action in CDS (Current Environment) Connector

I ran into a rather odd error recently when I was trying to use a FetchXML query to retrieve a list of Teams using the List Records action with the Common Data Service (Current Environment) Connector in a Power Automate flow, so to save you any future headaches I’ve outlined the issue below and the solution to the problem.

The Problem

In this instance I needed to retrieve a list of Teams related to Accounts that matched a specific N:N relationship. As this involved an N:N relationship, there are mulitple levels of link-entities and therefore we cannot use the normal OData filter query parameters.

The FetchXML query I created, using Jonas Rapp’s FetchXML Builder, was:

<fetch>
  <entity name="team" >
    <attribute name="teamid" />
    <link-entity name="account" from="accountid" to="regardingobjectid" >
      <link-entity name="cn_cn_practice_account" from="accountid" to="accountid" >
        <link-entity name="cn_practice" from="cn_practiceid" to="cn_practiceid" >
          <filter>
            <condition attribute="cn_name" operator="eq" value="Investment" />
          </filter>
        </link-entity>
      </link-entity>
    </link-entity>
  </entity>
</fetch>

I tested this query and it returned a valid list of results:

I then took the FetchXML query and added it to my List Records action and ran my Flow, so imagine my surprise when it failed!

The important part of the error details that were returned is below:

[Key property 'ownerid' of type 'Microsoft.Dynamics.CRM.team' is null. Key properties cannot have null values.]

The only problem with this error is that there is no “ownerid” property on a Team…

The SOLUTION

I was banging my head off my table trying to solve this issue and I was stumped, so I reached out to the community to see if anyone else had any ideas; fortunately for me Rob Dawson stepped up to the table with a genius idea; he suggested faking the ownerid as an alias for the administratorid attribute. This would literally never have occurred to me, so I’m extremely grateful for his help!

I added the new FetchXML query, with the ownerid alias for the administratorid attribute and, hey presto, it worked!

Conclusion

This was actually a relatively simple workaround for what appears to be a bug in the List Records step, but hopefully you’ll find it useful too! I’m always grateful to be part of a community that can help me when I’m stuck, and scenarios like this show how important it is to have a great network of peers to help you see solutions that wouldn’t otherwise occur to you

Converting Time zones with Power Automate

If you’ve ever had to convert a timezone with Power Automate then you’re hopefully aware that there is a “Convert Time Zone” action that is designed to make this process easier for you. If you’ve had to convert one time to multiple different time zones all at once then it very quickly becomes a pain to create a Flow as it requires a new action for each conversion.

Did you know that Microsoft supports 250 different time zones? If you wanted to see your local time represented in all of these different time zones all at once then it would be really inefficient to create a Flow for this, so how could we do it?

Note: if you’d like to see how to achieve the same functionality using a Select action instead of an array then read Pieter Veenstra’s excellent post on the topic.

The Solution

If you’ve read any of my recent posts, you’ll be aware that I’m a big fan of arrays, and this is a perfect opportunity to use one. In the Flow below I’m going to create an array of time zones using the data from the table on the Windows Default Time Zones page I linked above, and then I’ll convert the current UTC time to each of those to generate an output.

1. Trigger – for the purposes of this demo I’m using a manual trigger, but you could of course use any trigger that gives you a time and date you want to work with.

2. Initialize ConvertedTimes string variable – we’ll create an empty string variable called ConvertedTimes that we will use to capture the outputs when we loop through the time zones later in the Flow

3. Intialize TimezonesArray array variable – next we’ll create an array variable that we will populate with our array of time zones for conversion. I’ve included an extract of the array below:

[
  {
    "Timezone": "Afghanistan Standard Time",
    "UTC Offset": "(UTC+04:30)",
    "Description": "Kabul",
    "Country": "Afghanistan"
  },
  {
    "Timezone": "FLE Standard Time",
    "UTC Offset": "(UTC+02:00)",
    "Description": "Helsinki, Kyiv, Riga, Sofia, Tallinn, Vilnius",
    "Country": "Åland Islands"
  },
  {
    "Timezone": "Central Europe Standard Time",
    "UTC Offset": "(UTC+01:00)",
    "Description": "Belgrade, Bratislava, Budapest, Ljubljana, Prague",
    "Country": "Albania"
  },
  {
    "Timezone": "W. Central Africa Standard Time",
    "UTC Offset": "(UTC+01:00)",
    "Description": "West Central Africa",
    "Country": "Algeria"
  }
]

The array contains information on the Time Zone including the name, it’s UTC offset, a description of some of the cities where it has effect, and the country of origin.

The full array is included in the Flow that you can download by clicking the link at the bottom of this post.

4. Parse JSON – next we run a Parse JSON step on the TimezonesArray variable so we can access the array item values for use in our Apply to Each loop. The schema that we use for the Parse JSON step is:

{
    "type": "array",
    "items": {
        "type": "object",
        "properties": {
            "Timezone": {
                "type": "string"
            },
            "UTC Offset": {
                "type": "string"
            },
            "Description": {
                "type": "string"
            },
            "Country": {
                "type": "string"
            }
        },
        "required": [
            "Timezone",
            "UTC Offset",
            "Description",
            "Country"
        ]
    }
}

5. Apply to Each – we use the Apply to Each condition to loop through each of the time zones from our Time Zones Array. Inside the loop we only have one Append to String Variable action, and we’re using this to convert the time to the Time Zone for the array item and capture the output.

To convert the time zone we use the convertTimeZone expression. As you can see from the reference, the convertTimeZone expression uses the following format:

convertTimeZone(‘<timestamp>’, ‘<sourceTimeZone>’, ‘<destinationTimeZone>’, ‘<format>’?)

I’ve constructed the expression as follows:

convertTimeZone(utcnow(),'UTC',items('Apply_to_each')['Timezone'], 'dd MMMM yyyy hh:mm tt')
  1. timestamp – I’m using the utcNow() expression to get the current date and time, but of course you could pass in any value from your trigger to here
  2. sourceTimeZone – I’ve hardcoded this to be ‘UTC’ in my Flow, but you could get the current User’s timezone in your own scenario to set it dynamically, or set it to any other timezone
  3. destinationTimeZone – for the destination Time Zone I’m using the Time Zone from the current array item, so it will be set dynamically for each time zone
  4. format – I’ve created a custom date format to show me the day, month as a full word, full year, and then the time as a 12 hour display with an AM/PM designation

For the rest of the String I’m also including the Country, UTC Offset and Description from the array for each item, and then including a line break, so the output will look something like:

30 January 2020 06:34 AM Barbados (UTC-04:00) Georgetown, La Paz, Manaus, San Juan

6. Compose – The final step is just a compose step to let me see the output of the Apply to Each loop. Once you have all the times converted you could use them in whatever way you please

Based on the inputs above, the output from the Flow will look something like:

Conclusion

In this flow I wanted to demonstrate how we could take an array of timezone inputs and convert a specified time to all of them in a quick and efficient manner; in my demo I’ve used an array of 250 time zones but the good thing with an approach like this is that it doesn’t matter how many values are in your array.

I realise it’s unlikely that you’d want to convert a time to 250 different time zone values (and I’m also aware that there is crossover between time zones, so there are multiple time zones sharing the same UTC offset), but I’ve worked in organisations that have worldwide operations so it’s always useful to be able to convert deadlines to local times in each office. Similarly, I know that there are lots of virtual events that have attendees from all over the world so it is handy to be able to see the local time for each attendee.

I think this flow could be expanded even further to make it more dynamic, but I hope it has provided some useful food for thought. If you’d like to download it and have a play with it yourself then please click here