If you’ve used the standard OOTB connection between Dynamics 365 and SharePoint then I’m sure, like me, you’ll have found your share of frustrations.
The technical functionality is great, allowing you to see your documents stored in SharePoint in a subgrid on the related Dynamics 365 record, however the standard implementation will probably make your SharePoint admins cry because it uses a single SharePoint Site, with a Document Library for each Entity, and a Folder for each record.
Whilst this approach sort of makes sense; at scale it becomes pretty unmanageable and it runs counter to any recognised SharePoint best practices. In my organisation we wanted to have a SharePoint site per record which would allow us to control security much more robustly. Peter Baddeley has blogged about similar issues before and I’d highly recommend reading his posts about this.
The Scenario
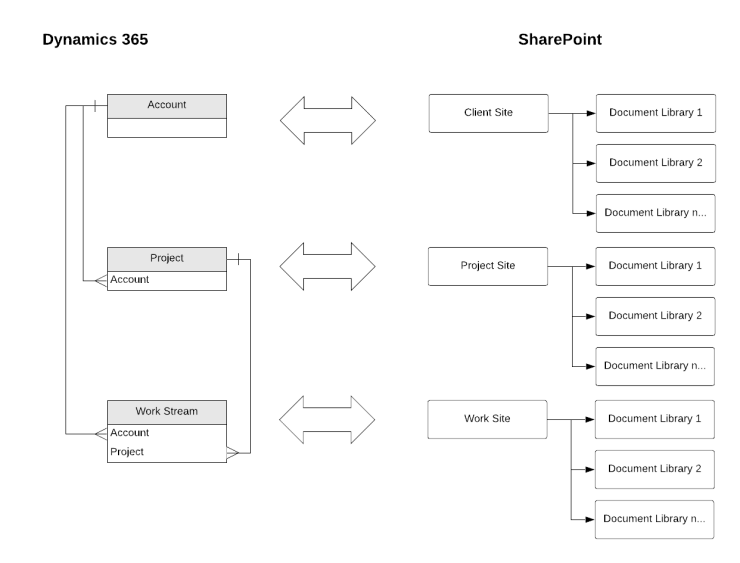
In my organisation we have Client SharePoint sites, linked to the Account record in Dynamics 365. Each of these SharePoint sites can have one or many Document Libraries depending upon the requirements of the Client. We then have a custom entity for Projects, and each Project has a SharePoint Site with one or many Document Libraries. Finally, each Project may have one or many Work Streams, and each of the Work Streams may have one or many Document Libraries
The relationships between the entities and the two systems can be visualised as below:

The Setup
As indicated above, in my scenario we have some custom entities:
- Project
- Lookup to Account entity
- Work Stream
- Lookup to Account entity
- Lookup to Project entity
Note that while there is a parent:child relationship between Accounts and Projects, and Projects and Work Sites, this doesn’t have to be reflected in SharePoint, thus we can avoid getting into nested site structures in SharePoint and take advantage of modern functionality like Hub Sites.
As part of my demonstration I’ll also add a few custom fields to my Account entity:
- Create SP Site – two option field I’ll use to trigger my Flow to run
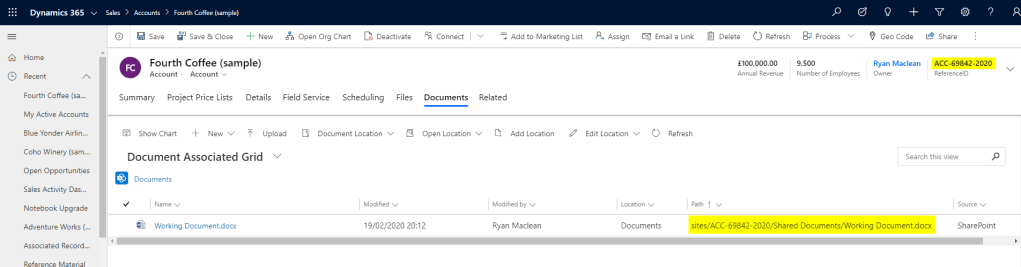
- Reference ID – An autonumber field to generate a unique ID for each Account, that we’ll use for the new site URL
- SP Site URL – a field to hold the URL for the site we’re creating, which we’ll use in Part 2 and Part 3 of this series
A key part of the setup is also to ensure that you’ve set up SharePoint integration and enabled Document Management on the entities we’ll be using – see the Microsoft documentation for more info on how to do this. As we’re creating a custom document management structure, you might want to avoid the default document location logic from firing – Alex Shlega covered this in his blog about custom folder structures for SharePoint integration.
The Solution
Now that we have a clear understanding of our scenario, we need to create a custom document management structure using a Power Automate flow. Before we jump into this you should be aware that the standard SharePoint Flow connector doesn’t allow you to create SharePoint Site collections, it will only allow you to create subsites. To work around this restriction we’re going to use an Azure Automation runbook to execute some PowerShell.
Azure Automation
I had written a lengthy explanation of how to create an Azure Automation runbook that we could call from a Flow, but then I found this post from Planet Technologies that explains so straightforwardly how to do this that I’d rather just link you to their blog. If you’ve never created an Azure Automation runbook, or you feel intimidated by the idea of PowerShell then I can assure you that you have no reason to worry. The steps in this blog are super easy to follow!
In my Azure Automation Runbook I’ve added a step using the Register-PnPHubSite cmdlet to register my Client (Account) site as a Hub site. By doing this I can then associate my Project and/or Work sites to this Hub using the Add-PnPHubSiteAssociation cmdlet, without having to implement a nested site structure.

The Flow

1. When a Record is Updated – for the trigger I’m using the “When a Record is Created, Updated or Deleted” trigger from the Common Data Service (Current Environment) Connector. In this instance I’m using the Update trigger condition, to check when the new “Create SP Site” field I created is set to “Yes”. Note below that I’ve set the Filtering attributes to this field, and set a Filter expression to only trigger the flow when the value of this field is True

2. List the Default SP sites to get the Base URL – next I am using a List Records step with a FetchXML query to retrieve the Default SharePoint site URL. When you set up your integration with SharePoint you would have specified a site, and this is listed in Dynamics 365 as a default site, so we can retrieve this easily. The FetchXML query I used is:
<fetch version="1.0" output-format="xml-platform" mapping="logical" distinct="false">
  <entity name="sharepointsite">
    <attribute name="name" />
    <attribute name="parentsite" />
    <attribute name="relativeurl" />
    <attribute name="absoluteurl" />
    <attribute name="validationstatus" />
    <attribute name="isdefault" />
    <order attribute="name" descending="false" />
    <filter type="and">
      <condition attribute="isdefault" operator="eq" value="1" />
    </filter>
  </entity>
</fetch>

3. Compose AbsoluteURL – As I’m only returning a single record in the List Records step above, I will use a Compose action to retrieve the Absolute URL field value, rather than having to use an Apply to Each step. To do this, we use a First expression to retrieve the first returned value, then we’ll interrogate the JSON to get the value we want. The expression I used is:
first(outputs('List_the_Default_SP_sites_to_get_the_Base_URL')?['body/value'])?['absoluteurl']

4. Initialise SiteURL – next we’ll create a string variable for the Site URL of the new SharePoint site we’re going to create. To do this, we’ll use the output of the compose step above, append it with the value “/sites/” (as the new site will be within the sites managed path in SharePoint) and then complete it with the autonumber value from the new Reference ID field we created.
Note: if you want to use the name of your record in D365 for the URL you might need to strip out any “dangerous” characters for the URL. In this case you could follow the great advice from AlanPS1 on his blog for stripping unwanted characters

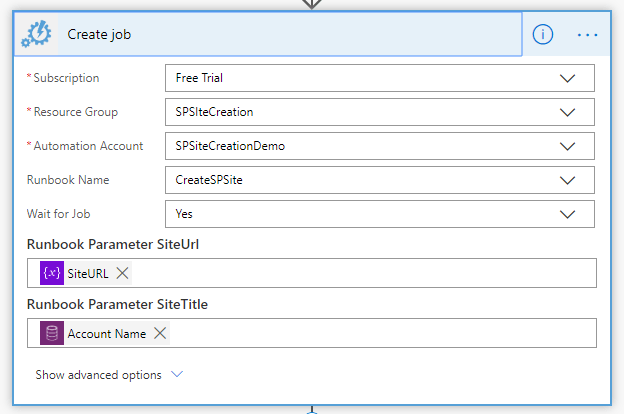
5. Create Azure Automation Job – now that we have our Site URL for the new site we want to create we’re going to use the Create Job action from the Azure Automation connector. In this action you’ll specify the Subscription, Resource Group, Automation Account and Runbook Name we created above. This will then bring up the Input parameters you specified in your runbook. In my case I just need the Site URL and the Account Name for my site title. Note that I’ve set “Wait for Job” to Yes, this is important to ensure the Job is completed before the action is marked as complete in your flow.
6. Create a new SP Site record – after the Azure Automation has done it’s work and created the SharePoint site we’re going to create a SharePoint Site record in Dynamics 365 for it. With this SharePoint Site record we will set the Absolute URL to the SiteURL we created earlier.

7. Create a new Document Location for Account – the final step in the Flow is create a Document Location record in D365 for the Account so we can actually see the SharePoint site and the documents stored there when we look at the Account record in D365. For the purposes of this demo I’m just creating a SharePoint Document Location for the default Documents document library that is created when you create a SharePoint site, so I know that the Name is “Documents” and the Relative URL is “shared documents”. If you were using a Template that created multiple document libraries you could use the SharePoint “Get all Lists and Libraries” action to retrieve them all then create a new Document Location for each Library that is returned.
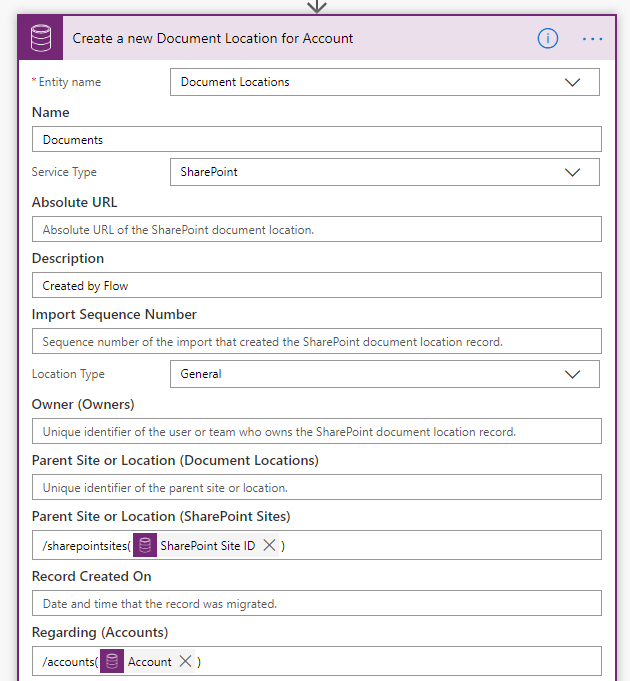
One thing to note here is that when I’m setting the Lookup fields I have to put them in the format “/PluralofEntityName(GUID)”. This is due to a known bug with the Common Data Service (Current Environment) connector – see this blog by Sara Lagerquist for more information on this issue.
Conclusion
In this blog post I wanted to demonstrate how easy it can be to create an advanced custom integration between Dynamics 365 and SharePoint, and how accessible it is even to non-developers like me now that we have such advanced functionality available to us in Power Automate flows and Azure Automation runbooks.
Implementing a custom integration allows you to implement proper security management, and makes the solution much more scalable for proper document management functionality. In the next blog I’ll show you how to create new SharePoint Document Libraries from within Dynamics 365.
If you think this is useful I’d love to get your thoughts on it, please drop a comment below or reach out to me on Twitter or LinkedIn!

[…] Better Integration between Dynamics 365 and SharePoint using Power Automate – Part 1 […]
LikeLike
[…] my previous post I discussed how to improve the integration between Dynamics 365 and SharePoint by creating a site […]
LikeLike
[…] my previous post I discussed how to improve the integration between Dynamics 365 and SharePoint by creating a site […]
LikeLike
[…] my previous post I discussed how to improve the integration between Dynamics 365 and SharePoint by creating a site […]
LikeLike
[…] Creating a custom site structure […]
LikeLike
[…] Creating a custom site structure […]
LikeLike
[…] Creating a custom site structure […]
LikeLike
[…] site related to the D365 record. For the Site Address I’m using the custom field I created in this post. Of course you could also retrieve the Absolute URL from the related SharePoint Site record. When […]
LikeLike
I was looking for some information on SharePoint and the D365 integration to refresh my memory on somethings. Really awesome approach, and some great reference links to other blogs that have helped me too! Thanks my friend! 😊
LikeLike