
In my previous post I discussed how to synchronise permissions between D365 Access Teams and a related SharePoint site. This works really well if you have a system locked down and only want to grant access to records to specific named users, but what happens if you want to allow all Users to Read all records, unless they need to be restricted?
In my organisation, our default position is to enable every User to Read and Update all Accounts unless we have a specific need to restrict access (e.g. in a situation where there is a conflict of interest, or particular client requirements). We also need to ensure these permissions settings are replicated in SharePoint.
We do this by utilising an Azure Active Directory Security Group which we add all relevant Users to. We then Share/Unshare records in Dynamics 365 as necessary, and add/remove the AAD Group to the SharePoint Site Members Permissions Group simultaneously.
The SETUP
In order to enable this functionality the first thing we do is ensure Users only have User-level Read and Write privileges on Accounts.

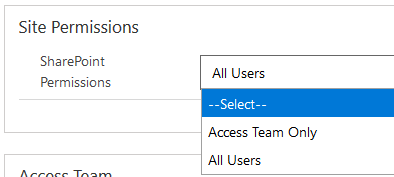
Next, we’re going to add a custom field that we’ll use for our trigger. In my case I’ve added an Option Set field called SharePoint Permissions. You’ll note from the screenshot below that there are only two options, but I’ve added it as an Option Set field. The reason I’ve used an Option Set instead of a Two-Option field is that we may need to change the options in future, and an Option Set gives us the flexibility to include additional options if needed
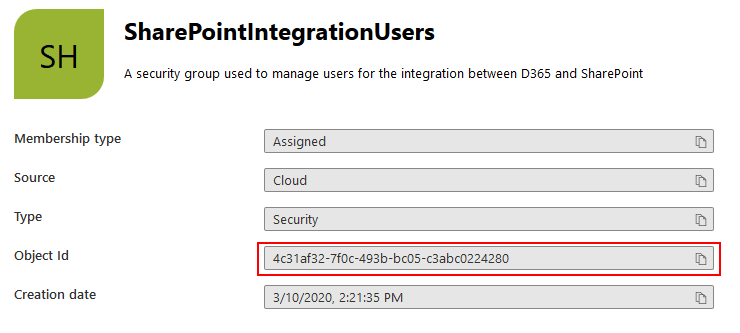
As we want to synchronise an Azure Active Directory Security Group, we need to make one in the Azure Portal (or you need to ask your friendly neighbourhood IT Team to do it for you, and to provide you with the Object Id
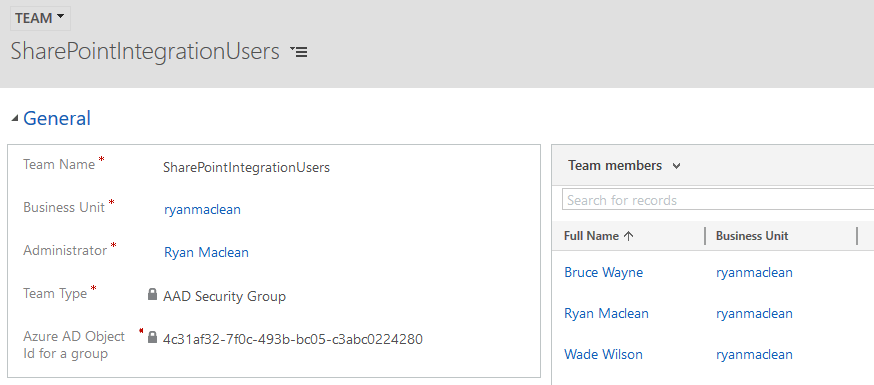
The final step in the setup is to create a Team in Dynamics 365, then set the “Team Type” to AAD Security Group, and set the “Azure Object Id for a group” to the Object Id from Azure
THE SOLUTION

1. When SharePoint Permissions field is updated – we’re using the using the Common Data Service (Current Environment) connector, and the “When a Record is Created, Updated or Deleted” trigger. We will set the Trigger Condition to Update, and then we’ll set the Filtering Attribute to our “SharePoint Permissions” field we created.

2. Initialize integrationGroupName – Next we’ll create a String Variable to hold the name of the Azure Active Directory Group we created earlier.

3. Initialize membersGroupID – we need to initialize another string Variable to hold the members Group ID from SharePoint. In this step we’ll leave the value blank, as we’ll set it later in the Flow.

4. Get all Groups – we’ll use the “Send HTTP Request to SharePoint” action to retireve a list of the Permissions Groups from the SharePoint site related to the D365 record. For the Site Address I’m using the custom field I created in this post. Of course you could also retrieve the Absolute URL from the related SharePoint Site record. When you have the site URL then it’s a imple call the API to retrieve all the existing groups

The output from this step will be a JSON, and I’ve included a sample extract below:
{
  "d": {
    "results": [
      {
        "__metadata": {
          "id": "https://<YOURSITE>.sharepoint.com/sites/ACC-01001-2020/_api/Web/SiteGroups/GetById(5)",
          "uri": "https://<YOURSITE>.sharepoint.com/sites/ACC-01001-2020/_api/Web/SiteGroups/GetById(5)",
          "type": "SP.Group"
        },
        "Owner": {
          "__deferred": {
            "uri": "https://<YOURSITE>.sharepoint.com/sites/ACC-01001-2020/_api/Web/SiteGroups/GetById(5)/Owner"
          }
        },
        "Users": {
          "__deferred": {
            "uri": "https://<YOURSITE>.sharepoint.com/sites/ACC-01001-2020/_api/Web/SiteGroups/GetById(5)/Users"
          }
        },
        "Id": 5,
        "IsHiddenInUI": false,
        "LoginName": "A. Datum Corporation (sample) Members",
        "Title": "A. Datum Corporation (sample) Members",
        "PrincipalType": 8,
        "AllowMembersEditMembership": true,
        "AllowRequestToJoinLeave": false,
        "AutoAcceptRequestToJoinLeave": false,
        "Description": null,
        "OnlyAllowMembersViewMembership": false,
        "OwnerTitle": "A. Datum Corporation (sample) Owners",
        "RequestToJoinLeaveEmailSetting": ""
      }
    ]
  }
}
5. Parse Groups JSON – in order to be able to use the JSON that we’ve returned above we need to parse it using a Parse JSON action, as this will allow us to use the output in the next step

6. Loop through results to find Members Group – For this part we’ll use an Apply to Each control to loop through each of the Groups we returned in Step 4 to find the ID of the Members group
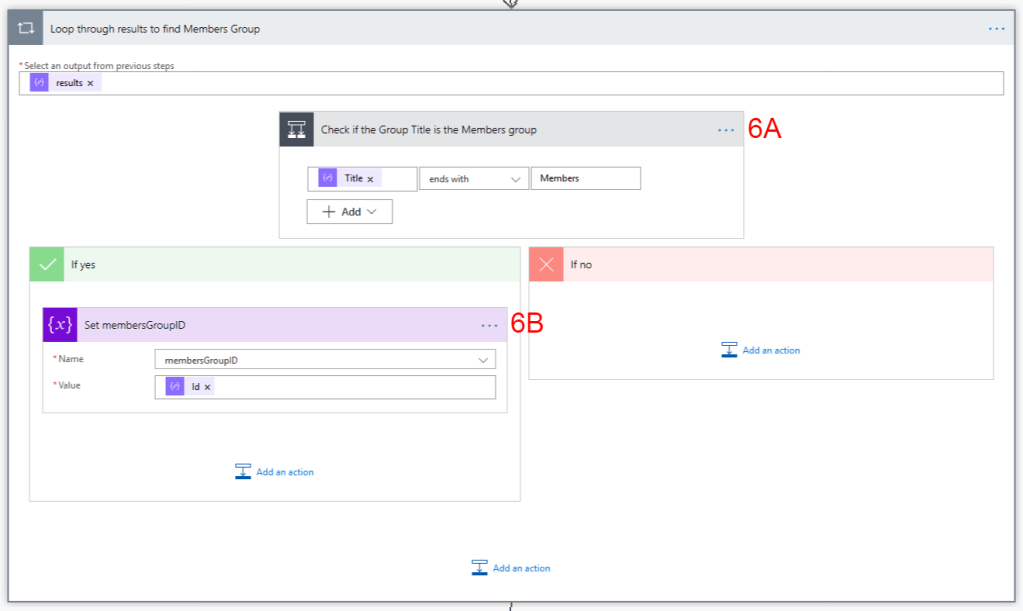
6A. Check if the Group Title is the Members Group – we’ll use a Condition control to check if the Title of the current Group ends with “Members” because the Members group is the one we want to be able to add/remove the AD group to/from
6B. If Yes, Set membersGroupID Variable – if the result of the condition at 6A is True then we’ll set the membersGroupID variable to the Group ID of the current Group
7. Check if Permissions is set to All Users – next we’ll use a Condition control to check if the SharePoint Permissions field is set to “All Users”. For this step we need to put in the Option Set Value that corresponds to the option we want to check against

If the answer to the question above is Yes, then we’ll follow steps 7A and 7B
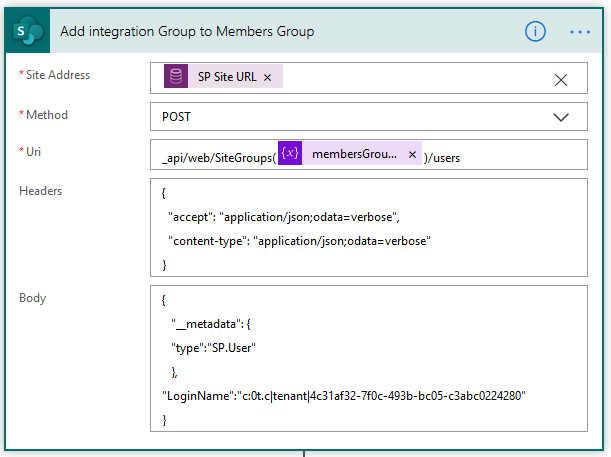
7A. Add Integration Group to Members Group – for this step we’ll be using the “Send HTTP Request to SharePoint” action agiain, and this time we’ll be using a POST method to add the Active Directory Group to the SharePoint Members Group.
As in Step 4, we’ll be using the SharePoint Site URL from custom field on our account, and we’ll be using the following Uri:
_api/web/SiteGroups(<GroupID>)/users
As we retrieved the Group ID in Step 6, we can use the membersGroupID variable for the Group ID parameter in the Uri.
In the Body of the request we’ll use the following format:
{
   "__metadata": {
   "type":"SP.User"
   },
"LoginName":"c:0t.c|tenant|4c31af32-7f0c-493b-bc05-c3abc0224280"
}
One of the key things to note here is that the LoginName parameter has to have the prefix “c:0t.c|tenant|”. The GUID that completes the LoginName is the Group Object Id from Azure Active Directory:
7B. Share Account with All Users Team – as we’re sharing the SharePoint site with all Users in our organisation, we also want to share the Account record in Dynamics 365 with all Users. We can do that by using the “Perform an Unbound Action” action from the Common Data Service (Current Environment) connector. There is an unbound action called GrantAccess that we can use. This action has two parameters:
1. Target – for this we use a reference to the Account just as we would if we were setting a lookup field, and we will retrieve the Account ID from our trigger.
/accounts(@{triggerOutputs()?['body/accountid']})
2. PrincipalAccess – the PrincipalAccess parameter requires JSON in the following format:
{
  "Principal": {
    "teamid": "E65D6729-E162-EA11-A812-000D3A86BA0B",
    "@{string('@')}odata.type": "Microsoft.Dynamics.CRM.team"
  },
  "AccessMask": "ReadAccess, WriteAccess"
}
There are a couple of key things to note here:
- For the TeamID, I’ve hardcoded the GUID in this instance, but you could retrieve the GUID dynamically if you wish.
- For the @odata.type: parameter we’ve escaped the “@” symbol by putting it into a string expression. You could also escape it by formatting it as @@, but in my experience reopening the action for edit caused it to revert back to just @, and then the action failed.
- The AccessMask specifies the rights you’re granting to the User/Team you’re sharing with. The full list of privileges you can grant is “ReadAccess, WriteAccess, AppendAccess, AppendToAccess, CreateAccess, DeleteAccess, ShareAccess, AssignAccess”

If the answer to the condition in Step 7 is False then we’ll follow steps 7C-7F:
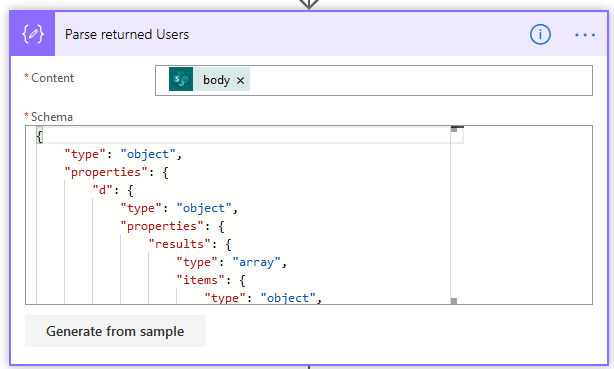
7C. Get all Members Group Users – we’ll use the “Send HTTP Request to SharePoint action to get a list of all the Users from the Members Group, again using the membersGroupID variable from above. The Uri is formatted as:
_api/Web/SiteGroups/GetById(@{variables('membersGroupID')})/users?$select=Id,Title
Note that we have a $select parameter to specify that we want to retrieve the User ID and Title.

7D. Parse returned Users – next we’ll use a Parse JSON action to parse the JSON that’s returned by the previous action so we can use it in the next step. The schema for this step is:
{
    "type": "object",
    "properties": {
        "d": {
            "type": "object",
            "properties": {
                "results": {
                    "type": "array",
                    "items": {
                        "type": "object",
                        "properties": {
                            "__metadata": {
                                "type": "object",
                                "properties": {
                                    "id": {
                                        "type": "string"
                                    },
                                    "uri": {
                                        "type": "string"
                                    },
                                    "type": {
                                        "type": "string"
                                    }
                                }
                            },
                            "Id": {
                                "type": "integer"
                            },
                            "Title": {
                                "type": "string"
                            }
                        },
                        "required": [
                            "__metadata",
                            "Id",
                            "Title"
                        ]
                    }
                }
            }
        }
    }
}
7E Check for the Integration Group – we use an Apply to Each control to loop through each of the returned Users to find the AD Group so we can remove it from the SharePoint Group

7E1. If Current User equal Integration Group – first we use a Condition control to check if the current User’s Title is equal to the integrationGroupName variable we set in Step 2

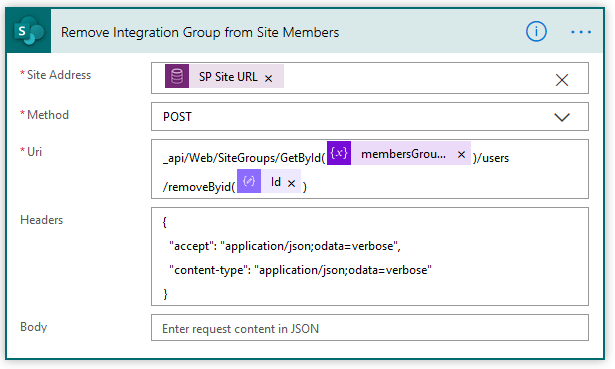
7E2. Remove Integration Group from Site Members – we use a final “Send HTTP Request to SharePoint” action to remove the AD Group from the SharePoint Group. The Uri for this action is:
_api/Web/SiteGroups/GetById(@{variables('membersGroupID')})/users/removeByid(@{items('Check_for_the_Integration_Group')?['Id']})
As you can see, we’re using the membersGroupID variable to specify the Group we’ll be removing the AD Group from, then we’ll use the current User’s ID from the loop to specify that this is the User we want to remove
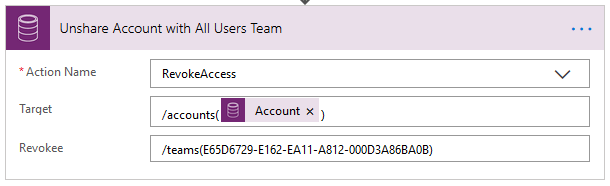
7F. Unshare Account with All Users Team – the final step in the Flow is to use another Unbound Action to RevokeAccess to the AllUsers team. The RevokeAccess action has two parameters:
1. Target – as in Step 7B we set this as we would a lookup field, using the following format:
/accounts(@{triggerOutputs()?['body/accountid']})
2. Revokee – this is another parameter that we can set as we would a lookup field. In this case we’re revoking access for a team, so we use the following format:
/teams(E65D6729-E162-EA11-A812-000D3A86BA0B)
Conclusion
Hopefully you’ll find this Flow useful. One of the things I like about it is that it’s using the same Azure Active Directory Group in both Dynamics 365 and SharePoint, so you don’t have to worry about trying to maintain and synchronise team memberships in two systems, it can all be centrally controlled and managed in Azure.
Let me know your thoughts on this by reaching out to me on Twitter or LinkedIn, or drop a comment below.

Published by