This is the third post in my series discussing a better integration betwen Dynamics 365 and SharePoint. If you’d like to read the previous two posts, check them out by clicking the links below:
In this post I’m going to demonstrate how to synchronise a Dynamics 365 Access Team with a related SharePoint site using Power Automate. One of the key frustrations I’ve experienced with the default integration between D365 and SP is that there is no reciprocity in permissions management between the two systems; working in the financial services industry we need to ensure that only those who should have access to a record and the related documents stored on SharePoint will have access, and we wanted to avoid having to make this synchronisation manual where possible.
THe SETUP
For this scenario you will need to have enabled the SharePoint integration and the custom site structure that I talked about in Part 1 of this series. Whilst you can secure items in SharePoint at item/folder level this is not recommended; SharePoint best practice typically recommends dealing with security at Site level.
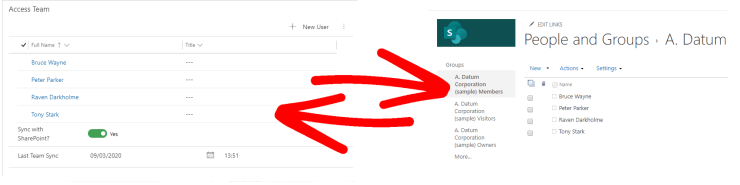
For the entities that you are going to be synchronising with SharePoint you will need to enable them for Access Teams and set up an appropriate Access Team Template.


We will also need to add two new fields to the entities that we’re going to be doing the permissions synchronisation for:
- Sync with SharePoint – a two-option field we’ll use to trigger our Flow
- Last Team Sync – a datetime field we’ll use to let Users know when the D365 team was last synced with SP
Now we’ve completed the setup, lets get on with making the Flow!
The Solution

1. When Account Sync with SharePoint equals Yes – for the trigger we’re using the Common Data Service (Current Environment) connector, and the “When a Record is Created, Updated or Deleted” trigger. We will set the Trigger Condition to Update, and then we’ll set the Filtering Attribute to our “Sync with SharePoint” two-option field we’ve created. As we only want the Flow to trigger when that field is set to Yes we will set the filter expression to ensure the two-option field equals true. This avoids us triggering redundant flow runs and implementing guard conditions

2. Get Related Access Team – next we’ll use a List Records action to retrieve the Access Team related to our entity. This is straightforward to do because Access Teams that are system generated automatically set the RegardingObjectID to the related record, so we can use this in our Fetch XML query to find the team we want. In my demo I only have one access team template for my entity, if you had two then you could add additional parameters to your query to ensure you return the right team.
In this case I’m going to be using a link-entity clause so I can find a team where the regardingobjectid equals the Account from my trigger.
The Fetch XML query I used is:
<fetch version="1.0" output-format="xml-platform" mapping="logical" distinct="false">
  <entity name="team">
    <attribute name="name" />
    <attribute name="teamid" />
    <attribute name="administratorid" alias="ownerid"/>
    <order attribute="name" descending="false" />
    <link-entity name="account" from="accountid" to="regardingobjectid" link-type="inner" alias="ab">
      <filter type="and">
        <condition attribute="accountid" operator="eq" value="@{triggerOutputs()?['body/accountid']}" />
      </filter>
    </link-entity>
  </entity>
</fetch>

3. Compose TeamID – as we’re only returning one result in our list records step above, we don’t want to add a redundant “Apply to Each” loop to find the attribute we want; instead we’ll use a First expression to query the returned JSON for the attribute. The expression I’ve used is:
first(outputs('Get_Related_Access_Team')?['body/value'])?['teamid']

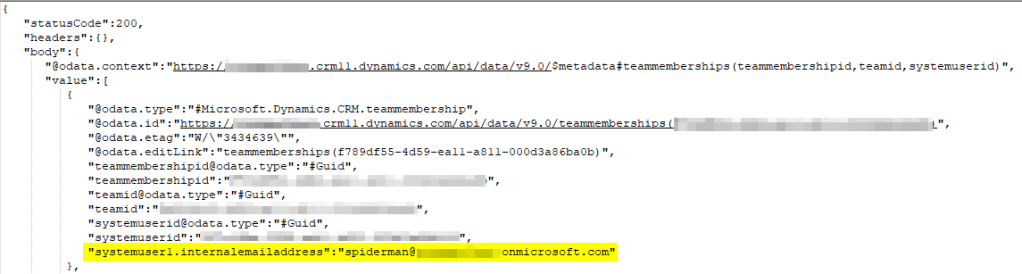
4. List CRM Team Members – now that we’ve got the Team ID set, we can interrogate the TeamMembership entity. If you’re not aware of it, the TeamMembership entity is an intersect entity between the SystemUser and Team entities. It will not appear in the list of available entities, so you will have to manually input teammemberships into the Entity Name field.
We can use another Fetch XML query to find the related Users and, importantly, their email addresses which we will use to add them to SharePoint later in the Flow. In the Fetch XML we’ll use the Team ID from the step above, and we’ll use a link-entity to retrieve the Users email address.
The Fetch XML query I used is:
<fetch>
  <entity name="teammembership" >
    <attribute name="teammembershipid" />
    <attribute name="teamid" />
    <attribute name="systemuserid" />
    <filter>
      <condition attribute="teamid" operator="eq" value="@{outputs('Compose_TeamID')}" />
    </filter>
    <link-entity name="systemuser" from="systemuserid" to="systemuserid" >
      <attribute name="internalemailaddress" />
    </link-entity>
  </entity>
</fetch>

The output of this step will produce JSON that will look something like below. As you can see, we’ve selected the internalemailaddress attribute from the SystemUser entity by using a link-entity in the Fetch XML query, and it is returned in the JSON as an attribute called systemuser1.internalemailaddress; this is important for the next step
5. Select CRM Users Email Addresses – in this step I’m using a Select action to create an array of the returned Users email addresses from the previous step. I do this because it gets rid of any additional “noise” from the returned JSON, which will make it easier to debug later. In the Select action I set the Key to “Email Address” and then in the Value I use the following expression:
@item()?['systemuser1.internalemailaddress']

6. Get SharePoint Team Members – for this step I’m going to be using the “Send HTTP Request to SharePoint” action. The Send HTTP request to SharePoint action lets you use the REST API, so we’re going to retrieve a list of the Users, and we’ll use a $select tag to specify that we want the Users email addresses. For the Site Address I’m using the value from the custom SP Site URL Field I created in Part 1 of this series.
The Uri we’re using is:
_api/Web/SiteGroups/GetById(5)/users?$select=Email

You’ll see above that I’ve specified the Group ID as 5, which is typically the members group (though Al Eardley has informed me this may not always be the case). If you have a specific group you would like to sync your Users to then you could retrieve all the Groups from the SP site, then loop through them to find the correct one and get the ID for that one to use in the step above.
7. Compose SPTeamMembers – next we’ll use another Compose step to convert the output from the previous step into a String object, as we need it to be a string for the purposes of the following steps. I’m also using a toLower expression to ensure consistency of results.
The expression I used is:
toLower(string(outputs('Get_SharePoint_Team_Members')?['body']))

8. For Each CRM User – in this step we’ll be using an Apply to Each to loop through the outputs from the Select action in Step 5

8A. Compose Email Address – the first step is to use a Compose action with a String expression to convert the array object to a string so we can use it in the next step. As in Step 7, I’m also using a toLower expression to ensure consistency of results. The expression is:
toLower(string(items('For_Each_CRM_User')?['Email Address']))

8B – Check if they are in the SharePoint Team – we’ll use a condition control to check if the current User’s email address appears in the list of Users email addresses we’ve extracted from SharePoint using a contains expression:
contains(outputs('Get_SharePoint_Team_Members')?['body'],outputs('Compose_EmailAddress'))
If the answer to this question is true we’ll do nothing (as they’re already in the SharePoint group), if the answer to the question is No then we’ll add them to the SharePoint group in the next step

8C – Add User to SharePoint Team – we’ll use another “Send HTTP Request to SharePoint” action to add a User to the SharePoint Group. In this instance we’re going to be using the POST method rather than the GET method. The Uri is:
_api/web/SiteGroups(5)/users
The body of our request is:
{   "__metadata": {
   "type":"SP.User"
   },
"LoginName":"i:0#.f|membership|@{outputs('Compose_EmailAddress')}"
}
Please note that the prefix “i:0#.f|membership|” is required for the login name, as this is part of how SharePoint handles claims based authentication

9. Parse SPTeamMembers – next we’ll use a Parse JSON action on the outputs from Step 6 above, and we’ll use the output of the Parse JSON step in step 10 below to loop through each returned user in the SharePoint Group. The schema for the Parse JSON action is:
{
    "type": "object",
    "properties": {
        "d": {
            "type": "object",
            "properties": {
                "results": {
                    "type": "array",
                    "items": {
                        "type": "object",
                        "properties": {
                            "__metadata": {
                                "type": "object",
                                "properties": {
                                    "id": {
                                        "type": "string"
                                    },
                                    "uri": {
                                        "type": "string"
                                    },
                                    "type": {
                                        "type": "string"
                                    }
                                }
                            },
                            "Email": {
                                "type": "string"
                            }
                        }
                    }
                }
            }
        }
    }
}

10. For each SP User – We’ll use an Apply to Each control to loop through the output results from the previous step
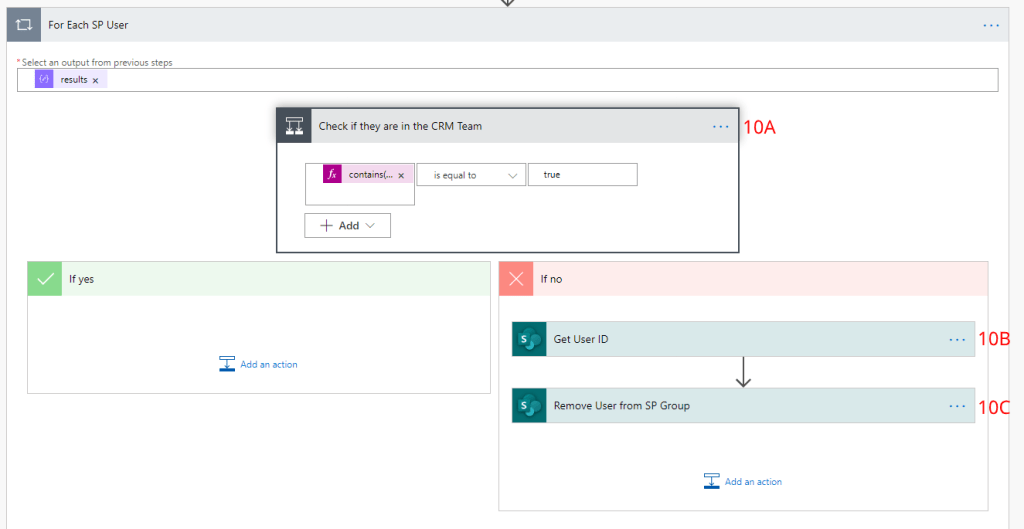
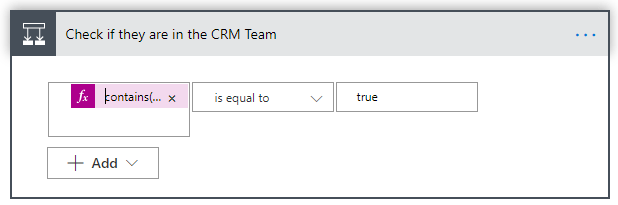
10A. Check if they are in the CRM Team – Similarly to step 8B, we’re going to use a Contains expression to check if the current SharePoint User’s email address is in the list of returned Users email addresses from Step 5
contains(string(body('Select_CRM_Users_Email_Addresses')),string(items('For_Each_SP_User')?['Email']))
If the answer to this question is Yes (the User is in both teams), then we’ll do nothing. If the answer to this question is No (the User is in the SharePoint group but is not in the D365 team) then we’ll run through the steps to remove them from the SharePoint group
10B. Get User ID – we’ll use another “Send HTTP Request to SharePoint” action to retrieve the ID of the User we want to remove from the SharePoint Group. We are using the GET method, and the following Uri:
_api/web/SiteUsers/getByEmail('@{items('For_Each_SP_User')?['Email']}')
We don’t need any headers or body parameters for this request

The output from this action will return JSON that looks like

As you can see, the User’s ID is under the path [‘d’][‘id’], so we’ll use this in the next step
10C. Remove User from SP Group – we’re going to use one more “Send HTTP Request to SharePoint” action to remove the User from the group. We’ll be using a POST method to perform the action, and the Uri for the action is:
_api/Web/SiteGroups(5)/users/removebyid(@{body('Get_User_Id')['d']['id']})
As you can see, we’ve specified the Site Group number we want to remove the User from, and then taken the ID from the step above to specify the User we want to remove.

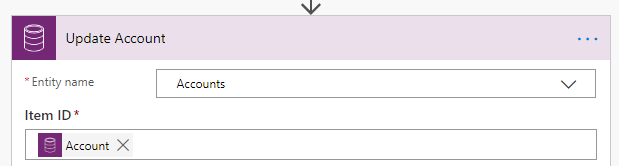
11. Update Account – the final step in the Flow is to use an Update Record step to set the “Last Sync Date” field to the current date using a utcNow expression

We will also set the “Sync with SharePoint” field back to No so it is ready for the next time the Team needs to be synced

As we set the filter expression in the trigger to only fire the Flow when this field equals Yes, changing the value back to No will not trigger a new Flow
Conclusion
This has hopefully given you an overview of how relatively straightforward it could be to synchronise security between Dynamics 365 records and an associated SharePoint site. There are a couple of things you may wish to consider alongside this:
- If you’re going to have multiple entities enabled for Document Management, you may wish to put the logic fro synchronising permissions in a Child Flow that could then be called by any entity
- As discussed above, good practice would dictate that you should always dynamically retrieve the specific SharePoint Group ID you want to synchronise permissions with, rather than hardcoding a value
- You may wish to set this to run on a schedule so permissions are synced automatically every X hours/days/weeks, etc.
- As of the date of publication, Flows cannot be triggered on N:N Associate/Dissociate actions in Dynamics 365, but you could use a trigger when a new record is created/deleted in the teammembership entity, or alternatively you could use a solution like North52 to create a custom trigger. I am personally more in favour of not using this approach for two reasons:
- Power Automate flows are currently asynchronous only, so this means you could potentially run into issues with concurrency if you are adding/removing multiple people at the same time from teams, which would lead to Dynamics 365 and SharePoint being out of sync
- If you have lots of teams, and the membership changes frequently, then you could trigger a lot of Flow runs, compared to this method which catches all changes in a single run
If you do find this useful I’d love to hear from you, please reach out to me on social media or drop a comment below to give me your thoughts!

[…] my previous post I discussed how to synchronise permissions between D365 Access Teams and a related SharePoint site. […]
LikeLike
[…] my previous post I discussed how to synchronise permissions between D365 Access Teams and a related SharePoint site. […]
LikeLike
[…] my previous post I discussed how to synchronise permissions between D365 Access Teams and a related SharePoint site. […]
LikeLike
A very good blog. The detailed step by step screenshot is also commendable. Really awesome work. Eagerly waiting for more of your posts. One can use _api/Web/SiteGroups/GetByName, in case we keep the team name and SharePoint group name same (or maintain a mapping for the same).
For eg: _api/Web/SiteGroups/GetByName(‘XXXXXX’)/users
LikeLike
[…] Another great article by Ryan Maclean describing an alternative way to Synchronizing Permission between Dynamics 365 and SharePoint using Power Automate […]
LikeLike