Selecting a specific SharePoint Document Library to Upload Dynamics 365 Email Attachments using Teams Adaptive Cards

In my recent series of posts I covered how to implement a better integration between Dynamics 365 and SharePoint. One of the common scenarios that you will encounter if you’ve integrated the systems is the requirement to move Email Attachments from Dynamics 365 to SharePoint. In my implementation a lot of my sites have more than one Document Library, and Users want to be able to select a specific library for their attachments to be uploaded to for each email than having them all go to one standard location and then having to be moved after they’ve been uploaded to SharePoint.

The Solution

The solution I developed to enable this was to use Teams Adaptive Cards. I have created a Flow that is triggered when a User tracks an email against an Account; the Flow sends the User an Adaptive Card in Teams which has a list of the available Document Libraries on the SharePoint site related to the Account, and asks the User to select which one they want to upload the files to. After a Document Library is selected the Flow then moves the attachments to SharePoint. I’ll run through the details below:

1. When a Tracked Email is Created – the first step is to define the trigger, and for this I’m using the Common Data Service (Current Environment) connector, and the “When a Record is Created, Updated or Deleted” trigger. In this instance I used the Filter Expression below to ensure the Flow is only triggered on emails that have attachments, and that are Set Regarding an item

_regardingobjectid_value ne null and attachmentcount gt 0

2. Get User who Created Email – next I use the Get Record action to retrieve the User record for the User who tracked the email into the system. ONe thing to note here is that I’m using the value in the “Owner” field rather than the “Created by” field. This is because when an email is tracked on creation it is created by the SYSTEM account and then ownership is assigned to the tracking User. We get the User details so that we can retrieve their email address for use later in the Flow

3. Get Regarding Account – we use another Get Record action to retrieve the details of the Account against whom the email is tracked. Note that in your environment if you have multiple entities enabled for email integration then you may wish to implement a Switch action here so you can retrieve the details of any record that you might be tracking emails against; for the purposes of this demo I’ve kept it simple. We need to retrieve the Account record so we can use some of the values in our adaptive card later in the Flow.

4. List Document Locations related to Account – next we want to retrieve all of the related Document Locations for the Account as each Document Location represents a SharePoint Document Library, so we’ll use a List Records action with the following filter query:

_regardingobjectid_value eq @{triggerOutputs()?['body/_regardingobjectid_value']}

We’ll loop through these Document Locations to create the ChoiceSet for our adaptive card in the next steps.

5. Initialize Choices Array variable – we need to use an “Initialize Variable” action to create an empty array that we can use when we loop through the Document Locations we returned above.


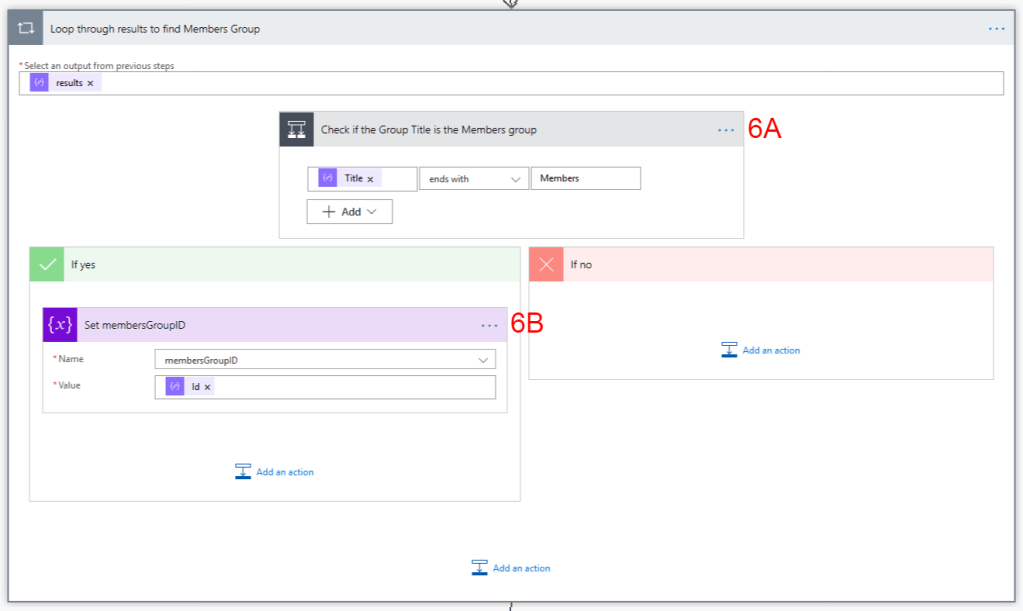
6. Apply to Each Document Location – we’ll use an Apply to Each control to loop through each Document Location we returned in Step 4

6A. Append to Choices Array – for each Document Location we’re going to use an Append to Array Variable to create a new element in the Choices Array we created above. This array will be used in the Adaptive Card we create later in the Flow. The array value we use is:

{
  "value": "@{items('Apply_to_each_Document_Location')?['sharepointdocumentlocationid']}/@{items('Apply_to_each_Document_Location')?['name']}",
  "title": "@{items('Apply_to_each_Document_Location')?['name']}"
}

One of the things you may notice is that for the “Value” in the array element I’ve constructed it as [GUID_OF_DOCUMENT_LOCATION]/[DOCUMENT_LOCATION_NAME]. The reason for this is that the choice a User makes will return that value to the Flow and I need both the GUID and the Name later in the Flow, so I concatenate them just now and then I’ll split them after they get returned.

A sample of the output from this step is below:

{
  "value": "6127202a-b958-ea11-a811-000d3a86ba0b/Communication Info",
  "title": "Communication Info"
}

7. Ask User which Document Library for Uploads – this is the key action in the Flow. We’re using the “Post an Adaptive Card to a Teams user and wait for a response” action. The adaptive cards are created with JSON, and fortunately there are some great samples available at https://adaptivecards.io/samples/. I also found the “Utimate Guide” written by Tomasz Poszytek to be incredibly helpful.

The card I designed looks like this:

The JSON I used to create my card is:

{
    "type": "AdaptiveCard",
    "$schema": "http://adaptivecards.io/schemas/adaptive-card.json",
    "version": "1.0",
    "body": [
        {
            "type": "TextBlock",
            "size": "Medium",
            "weight": "Bolder",
            "text": "Upload Attachments to SharePoint"
        },
        {
            "type": "ColumnSet",
            "columns": [
                {
                    "type": "Column",
                    "items": [
                        {
                            "type": "TextBlock",
                            "weight": "Bolder",
                            "text": "@{triggerOutputs()?['body/subject']}",
                            "wrap": true
                        },
                        {
                            "type": "TextBlock",
                            "spacing": "None",
                            "text": "Created @{formatDateTime(utcnow(), 'dd MMMM yyyy HH:mm')}",
                            "isSubtle": true,
                            "wrap": true
                        }
                    ],
                    "width": "stretch"
                }
            ]
        },
        {
            "type": "TextBlock",
            "text": "You tracked an email against @{outputs('Get_regarding_Account')?['body/name']}.  Please select a Document Library from the List below to upload the attached documents to",
            "wrap": true
        },
{
            "type": "FactSet",
            "facts": [
                {
                    "title": "Account:",
                    "value": "@{outputs('Get_regarding_Account')?['body/name']}"
                },
                {
                    "title": "SharePoint Site:",
                    "value": "@{outputs('Get_regarding_Account')?['body/rm365_spsiteurl']}"
                },
                {
                    "title": "Subject:",
                    "value": "@{triggerOutputs()?['body/subject']}"
                },
                {
                    "title": "Sent To:",
                    "value": "@{triggerOutputs()?['body/torecipients']}"
                },
                {
                    "title": "Sent From:",
                    "value": "@{triggerOutputs()?['body/sender']}"
                }
            ]
        },       
		{
            "type": "Input.ChoiceSet",
            "id": "CompactSelectVal",
            "value": "1",
            "choices": 
               @{variables('choices')}
        }
    ],
    "actions": [
        {
            "type": "Action.Submit",
            "title": "Submit"
        }
    ]
}

As you can see, in Line 71 I’m using the Choices Variable to set the ChoiceSet for the User.

I also use the User’s Primary Email address that I got in Step 2 to specify who I will be sending the adaptive card to:

The output from the Adaptive card is JSON that looks like:

{
  "responseTime": "2020-04-02T15:38:10.0668583Z",
  "responder": {
    "objectId": "[GUID]",
    "tenantId": "[GUID]",
    "email": "user@emailaddress.com",
    "userPrincipalName": "user@emailaddress.com",
    "displayName": "Ryan Maclean"
  },
  "submitActionId": "Submit",
  "data": {
    "CompactSelectVal": "9a819bbc-4d56-ea11-a811-000d3a86ba0b/Contracts"
  }
}

We’ll be using the information returned in the Data section in the next two steps.

8. Compose DocLib Name – for this step we’ll be using a Compose action with a substring expression to extract the Document Library name that we concatenated with the GUID above. The GUID is a 36 character string, so we can set the startindex of our substring to 36. The expression we use is:

substring(outputs('Ask_User_which_Document_Library_for_Uploads')?['body']?['data']?['CompactSelectVal'],36)

9. Compose DocLib GUID – in this step we’re doing the exact same as the step above, but in this case we’ll set the startindex of our substring to 0 and the length to 36:

substring(outputs('Ask_User_which_Document_Library_for_Uploads')?['body']?['data']?['CompactSelectVal'],0,36)

10. Get AbsoluteURL for SharePoint Document Library – in this step we’re going to be using the HTTP with Azure AD connector and the Invoke an HTTP request action to query the Web API with the RetrieveAbsoluteAndSiteCollectionUrl Function so we can return the Site Collection URL for our SharePoint site and get the absolute URL for the specific Document Location the User selected. All credit for this goes to Thomas Peschat. His blog covers the full detail of this step, so I’d recommend reading it for more information.

In the Url of the request I’m using the GUID that I retrieved as an output from Step 9 above to specify the document library I want the URLs from.

11. Compose AbsoluteURL – in this step we’re using a Compose action to extract the AbsoluteURL of the Document library from the output of the step above

12. Compose SiteCollectionUrl – as above, we’re using a Compose action to extract the SiteCollectionUrl from the output of Step 10

13. List Email Attachments – in order to get the Attachment details from D365 we need to do a List Records action on the activitymimeattachment entity. This won’t appear in the dropdown list so you’ll need to enter it as a custom value. Our filter query will be:

_objectid_value eq @{triggerOutputs()?['body/activityid']}

14. Apply to each Attachment – we’ll use an Apply to Each control to loop through each Attachment we returned in the previous step

14A. Create file in selected SharePoint Document Library – for each Attachment from our D365 email we’ll create a file in the SharePoint Document Library using a Create File action. The key elements are:

  1. Site Address – we use the SiteCollectionUrl output from the compose step 12 above
  2. Folder Path – we use the DocLibName output from the compose step 8 above
  3. File Name – we use the File Name from the attachment
  4. File Content – the file content needs to be in binary format, but in D365 it is stored in base64 format, so we need to use a base64ToBinary expression

You may also wish to add a final step to your flow to delete the attachments from Dynamics 365 after they’ve been uploaded to SharePoint.

Conclusion

This is my first attempt at using Teams Adaptive Cards and I’m really impressed with the flexibility they offer. At the moment they wait for up to 30 days for an input from a User, I’d like it if I could change that and also offer a default resolution if no option is selected.

I think this approach offers a good degree of flexibility to Users to enable the migration of email attachments from D365 to SharePoint, and I believe the use of Adaptive Cards will help with adoption. I’m also experimenting with Outlook actionable messages to offer similar functionality.

I’d love to hear your feedback on whether you think this approach could work for you, so please feel free to reach out to me on social media or drop a comment below!

Synchronising Azure Active Directory Security Groups between D365 Records and SharePoint Sites

In my previous post I discussed how to synchronise permissions between D365 Access Teams and a related SharePoint site. This works really well if you have a system locked down and only want to grant access to records to specific named users, but what happens if you want to allow all Users to Read all records, unless they need to be restricted?

In my organisation, our default position is to enable every User to Read and Update all Accounts unless we have a specific need to restrict access (e.g. in a situation where there is a conflict of interest, or particular client requirements). We also need to ensure these permissions settings are replicated in SharePoint.

We do this by utilising an Azure Active Directory Security Group which we add all relevant Users to. We then Share/Unshare records in Dynamics 365 as necessary, and add/remove the AAD Group to the SharePoint Site Members Permissions Group simultaneously.

The SETUP

In order to enable this functionality the first thing we do is ensure Users only have User-level Read and Write privileges on Accounts.

Next, we’re going to add a custom field that we’ll use for our trigger. In my case I’ve added an Option Set field called SharePoint Permissions. You’ll note from the screenshot below that there are only two options, but I’ve added it as an Option Set field. The reason I’ve used an Option Set instead of a Two-Option field is that we may need to change the options in future, and an Option Set gives us the flexibility to include additional options if needed

As we want to synchronise an Azure Active Directory Security Group, we need to make one in the Azure Portal (or you need to ask your friendly neighbourhood IT Team to do it for you, and to provide you with the Object Id

The final step in the setup is to create a Team in Dynamics 365, then set the “Team Type” to AAD Security Group, and set the “Azure Object Id for a group” to the Object Id from Azure

THE SOLUTION

1. When SharePoint Permissions field is updated – we’re using the using the Common Data Service (Current Environment) connector, and the “When a Record is Created, Updated or Deleted” trigger. We will set the Trigger Condition to Update, and then we’ll set the Filtering Attribute to our “SharePoint Permissions” field we created.

2. Initialize integrationGroupName – Next we’ll create a String Variable to hold the name of the Azure Active Directory Group we created earlier.

3. Initialize membersGroupID – we need to initialize another string Variable to hold the members Group ID from SharePoint. In this step we’ll leave the value blank, as we’ll set it later in the Flow.

4. Get all Groups – we’ll use the “Send HTTP Request to SharePoint” action to retireve a list of the Permissions Groups from the SharePoint site related to the D365 record. For the Site Address I’m using the custom field I created in this post. Of course you could also retrieve the Absolute URL from the related SharePoint Site record. When you have the site URL then it’s a imple call the API to retrieve all the existing groups

The output from this step will be a JSON, and I’ve included a sample extract below:

{
  "d": {
    "results": [
      {
        "__metadata": {
          "id": "https://<YOURSITE>.sharepoint.com/sites/ACC-01001-2020/_api/Web/SiteGroups/GetById(5)",
          "uri": "https://<YOURSITE>.sharepoint.com/sites/ACC-01001-2020/_api/Web/SiteGroups/GetById(5)",
          "type": "SP.Group"
        },
        "Owner": {
          "__deferred": {
            "uri": "https://<YOURSITE>.sharepoint.com/sites/ACC-01001-2020/_api/Web/SiteGroups/GetById(5)/Owner"
          }
        },
        "Users": {
          "__deferred": {
            "uri": "https://<YOURSITE>.sharepoint.com/sites/ACC-01001-2020/_api/Web/SiteGroups/GetById(5)/Users"
          }
        },
        "Id": 5,
        "IsHiddenInUI": false,
        "LoginName": "A. Datum Corporation (sample) Members",
        "Title": "A. Datum Corporation (sample) Members",
        "PrincipalType": 8,
        "AllowMembersEditMembership": true,
        "AllowRequestToJoinLeave": false,
        "AutoAcceptRequestToJoinLeave": false,
        "Description": null,
        "OnlyAllowMembersViewMembership": false,
        "OwnerTitle": "A. Datum Corporation (sample) Owners",
        "RequestToJoinLeaveEmailSetting": ""
      }
    ]
  }
}

5. Parse Groups JSON – in order to be able to use the JSON that we’ve returned above we need to parse it using a Parse JSON action, as this will allow us to use the output in the next step

6. Loop through results to find Members Group – For this part we’ll use an Apply to Each control to loop through each of the Groups we returned in Step 4 to find the ID of the Members group

6A. Check if the Group Title is the Members Group – we’ll use a Condition control to check if the Title of the current Group ends with “Members” because the Members group is the one we want to be able to add/remove the AD group to/from

6B. If Yes, Set membersGroupID Variable – if the result of the condition at 6A is True then we’ll set the membersGroupID variable to the Group ID of the current Group

7. Check if Permissions is set to All Users – next we’ll use a Condition control to check if the SharePoint Permissions field is set to “All Users”. For this step we need to put in the Option Set Value that corresponds to the option we want to check against

If the answer to the question above is Yes, then we’ll follow steps 7A and 7B

7A. Add Integration Group to Members Group – for this step we’ll be using the “Send HTTP Request to SharePoint” action agiain, and this time we’ll be using a POST method to add the Active Directory Group to the SharePoint Members Group.

As in Step 4, we’ll be using the SharePoint Site URL from custom field on our account, and we’ll be using the following Uri:

_api/web/SiteGroups(<GroupID>)/users 

As we retrieved the Group ID in Step 6, we can use the membersGroupID variable for the Group ID parameter in the Uri.

In the Body of the request we’ll use the following format:

{  
   "__metadata": {  
   "type":"SP.User"  
   },  
"LoginName":"c:0t.c|tenant|4c31af32-7f0c-493b-bc05-c3abc0224280"
}  

One of the key things to note here is that the LoginName parameter has to have the prefix “c:0t.c|tenant|”. The GUID that completes the LoginName is the Group Object Id from Azure Active Directory:

7B. Share Account with All Users Team – as we’re sharing the SharePoint site with all Users in our organisation, we also want to share the Account record in Dynamics 365 with all Users. We can do that by using the “Perform an Unbound Action” action from the Common Data Service (Current Environment) connector. There is an unbound action called GrantAccess that we can use. This action has two parameters:

1. Target – for this we use a reference to the Account just as we would if we were setting a lookup field, and we will retrieve the Account ID from our trigger.

/accounts(@{triggerOutputs()?['body/accountid']})

2. PrincipalAccess – the PrincipalAccess parameter requires JSON in the following format:

{
  "Principal": {
    "teamid": "E65D6729-E162-EA11-A812-000D3A86BA0B",
    "@{string('@')}odata.type": "Microsoft.Dynamics.CRM.team"
  },
  "AccessMask": "ReadAccess, WriteAccess"
}

There are a couple of key things to note here:

  1. For the TeamID, I’ve hardcoded the GUID in this instance, but you could retrieve the GUID dynamically if you wish.
  2. For the @odata.type: parameter we’ve escaped the “@” symbol by putting it into a string expression. You could also escape it by formatting it as @@, but in my experience reopening the action for edit caused it to revert back to just @, and then the action failed.
  3. The AccessMask specifies the rights you’re granting to the User/Team you’re sharing with. The full list of privileges you can grant is “ReadAccess, WriteAccess, AppendAccess, AppendToAccess, CreateAccess, DeleteAccess, ShareAccess, AssignAccess”

If the answer to the condition in Step 7 is False then we’ll follow steps 7C-7F:

7C. Get all Members Group Users – we’ll use the “Send HTTP Request to SharePoint action to get a list of all the Users from the Members Group, again using the membersGroupID variable from above. The Uri is formatted as:

_api/Web/SiteGroups/GetById(@{variables('membersGroupID')})/users?$select=Id,Title

Note that we have a $select parameter to specify that we want to retrieve the User ID and Title.

7D. Parse returned Users – next we’ll use a Parse JSON action to parse the JSON that’s returned by the previous action so we can use it in the next step. The schema for this step is:

{
    "type": "object",
    "properties": {
        "d": {
            "type": "object",
            "properties": {
                "results": {
                    "type": "array",
                    "items": {
                        "type": "object",
                        "properties": {
                            "__metadata": {
                                "type": "object",
                                "properties": {
                                    "id": {
                                        "type": "string"
                                    },
                                    "uri": {
                                        "type": "string"
                                    },
                                    "type": {
                                        "type": "string"
                                    }
                                }
                            },
                            "Id": {
                                "type": "integer"
                            },
                            "Title": {
                                "type": "string"
                            }
                        },
                        "required": [
                            "__metadata",
                            "Id",
                            "Title"
                        ]
                    }
                }
            }
        }
    }
}

7E Check for the Integration Group – we use an Apply to Each control to loop through each of the returned Users to find the AD Group so we can remove it from the SharePoint Group

7E1. If Current User equal Integration Group – first we use a Condition control to check if the current User’s Title is equal to the integrationGroupName variable we set in Step 2

7E2. Remove Integration Group from Site Members – we use a final “Send HTTP Request to SharePoint” action to remove the AD Group from the SharePoint Group. The Uri for this action is:

_api/Web/SiteGroups/GetById(@{variables('membersGroupID')})/users/removeByid(@{items('Check_for_the_Integration_Group')?['Id']})

As you can see, we’re using the membersGroupID variable to specify the Group we’ll be removing the AD Group from, then we’ll use the current User’s ID from the loop to specify that this is the User we want to remove

7F. Unshare Account with All Users Team – the final step in the Flow is to use another Unbound Action to RevokeAccess to the AllUsers team. The RevokeAccess action has two parameters:

1. Target – as in Step 7B we set this as we would a lookup field, using the following format:

/accounts(@{triggerOutputs()?['body/accountid']})

2. Revokee – this is another parameter that we can set as we would a lookup field. In this case we’re revoking access for a team, so we use the following format:

/teams(E65D6729-E162-EA11-A812-000D3A86BA0B)

Conclusion

Hopefully you’ll find this Flow useful. One of the things I like about it is that it’s using the same Azure Active Directory Group in both Dynamics 365 and SharePoint, so you don’t have to worry about trying to maintain and synchronise team memberships in two systems, it can all be centrally controlled and managed in Azure.

Let me know your thoughts on this by reaching out to me on Twitter or LinkedIn, or drop a comment below.

Synchronising Permissions Between Dynamics 365 and SharePoint Using Power Automate

This is the third post in my series discussing a better integration betwen Dynamics 365 and SharePoint. If you’d like to read the previous two posts, check them out by clicking the links below:

  1. Creating a custom site structure
  2. Synchronising Document Libraries

In this post I’m going to demonstrate how to synchronise a Dynamics 365 Access Team with a related SharePoint site using Power Automate. One of the key frustrations I’ve experienced with the default integration between D365 and SP is that there is no reciprocity in permissions management between the two systems; working in the financial services industry we need to ensure that only those who should have access to a record and the related documents stored on SharePoint will have access, and we wanted to avoid having to make this synchronisation manual where possible.

THe SETUP

For this scenario you will need to have enabled the SharePoint integration and the custom site structure that I talked about in Part 1 of this series. Whilst you can secure items in SharePoint at item/folder level this is not recommended; SharePoint best practice typically recommends dealing with security at Site level.

For the entities that you are going to be synchronising with SharePoint you will need to enable them for Access Teams and set up an appropriate Access Team Template.

We will also need to add two new fields to the entities that we’re going to be doing the permissions synchronisation for:

  1. Sync with SharePoint – a two-option field we’ll use to trigger our Flow
  2. Last Team Sync – a datetime field we’ll use to let Users know when the D365 team was last synced with SP

Now we’ve completed the setup, lets get on with making the Flow!

The Solution

1. When Account Sync with SharePoint equals Yes – for the trigger we’re using the Common Data Service (Current Environment) connector, and the “When a Record is Created, Updated or Deleted” trigger. We will set the Trigger Condition to Update, and then we’ll set the Filtering Attribute to our “Sync with SharePoint” two-option field we’ve created. As we only want the Flow to trigger when that field is set to Yes we will set the filter expression to ensure the two-option field equals true. This avoids us triggering redundant flow runs and implementing guard conditions

2. Get Related Access Team – next we’ll use a List Records action to retrieve the Access Team related to our entity. This is straightforward to do because Access Teams that are system generated automatically set the RegardingObjectID to the related record, so we can use this in our Fetch XML query to find the team we want. In my demo I only have one access team template for my entity, if you had two then you could add additional parameters to your query to ensure you return the right team.

In this case I’m going to be using a link-entity clause so I can find a team where the regardingobjectid equals the Account from my trigger.

The Fetch XML query I used is:

<fetch version="1.0" output-format="xml-platform" mapping="logical" distinct="false">
  <entity name="team">
    <attribute name="name" />
    <attribute name="teamid" />
    <attribute name="administratorid" alias="ownerid"/>
    <order attribute="name" descending="false" />
    <link-entity name="account" from="accountid" to="regardingobjectid" link-type="inner" alias="ab">
      <filter type="and">
        <condition attribute="accountid" operator="eq" value="@{triggerOutputs()?['body/accountid']}" />
      </filter>
    </link-entity>
  </entity>
</fetch>

3. Compose TeamID – as we’re only returning one result in our list records step above, we don’t want to add a redundant “Apply to Each” loop to find the attribute we want; instead we’ll use a First expression to query the returned JSON for the attribute. The expression I’ve used is:

first(outputs('Get_Related_Access_Team')?['body/value'])?['teamid']

4. List CRM Team Members – now that we’ve got the Team ID set, we can interrogate the TeamMembership entity. If you’re not aware of it, the TeamMembership entity is an intersect entity between the SystemUser and Team entities. It will not appear in the list of available entities, so you will have to manually input teammemberships into the Entity Name field.

We can use another Fetch XML query to find the related Users and, importantly, their email addresses which we will use to add them to SharePoint later in the Flow. In the Fetch XML we’ll use the Team ID from the step above, and we’ll use a link-entity to retrieve the Users email address.

The Fetch XML query I used is:

<fetch>
  <entity name="teammembership" >
    <attribute name="teammembershipid" />
    <attribute name="teamid" />
    <attribute name="systemuserid" />
    <filter>
      <condition attribute="teamid" operator="eq" value="@{outputs('Compose_TeamID')}" />
    </filter>
    <link-entity name="systemuser" from="systemuserid" to="systemuserid" >
      <attribute name="internalemailaddress" />
    </link-entity>
  </entity>
</fetch>

The output of this step will produce JSON that will look something like below. As you can see, we’ve selected the internalemailaddress attribute from the SystemUser entity by using a link-entity in the Fetch XML query, and it is returned in the JSON as an attribute called systemuser1.internalemailaddress; this is important for the next step

5. Select CRM Users Email Addresses – in this step I’m using a Select action to create an array of the returned Users email addresses from the previous step. I do this because it gets rid of any additional “noise” from the returned JSON, which will make it easier to debug later. In the Select action I set the Key to “Email Address” and then in the Value I use the following expression:

@item()?['systemuser1.internalemailaddress']

6. Get SharePoint Team Members – for this step I’m going to be using the “Send HTTP Request to SharePoint” action. The Send HTTP request to SharePoint action lets you use the REST API, so we’re going to retrieve a list of the Users, and we’ll use a $select tag to specify that we want the Users email addresses. For the Site Address I’m using the value from the custom SP Site URL Field I created in Part 1 of this series.

The Uri we’re using is:

_api/Web/SiteGroups/GetById(5)/users?$select=Email

You’ll see above that I’ve specified the Group ID as 5, which is typically the members group (though Al Eardley has informed me this may not always be the case). If you have a specific group you would like to sync your Users to then you could retrieve all the Groups from the SP site, then loop through them to find the correct one and get the ID for that one to use in the step above.

7. Compose SPTeamMembers – next we’ll use another Compose step to convert the output from the previous step into a String object, as we need it to be a string for the purposes of the following steps. I’m also using a toLower expression to ensure consistency of results.

The expression I used is:

toLower(string(outputs('Get_SharePoint_Team_Members')?['body']))

8. For Each CRM User – in this step we’ll be using an Apply to Each to loop through the outputs from the Select action in Step 5

8A. Compose Email Address – the first step is to use a Compose action with a String expression to convert the array object to a string so we can use it in the next step. As in Step 7, I’m also using a toLower expression to ensure consistency of results. The expression is:

toLower(string(items('For_Each_CRM_User')?['Email Address']))

8B – Check if they are in the SharePoint Team – we’ll use a condition control to check if the current User’s email address appears in the list of Users email addresses we’ve extracted from SharePoint using a contains expression:

contains(outputs('Get_SharePoint_Team_Members')?['body'],outputs('Compose_EmailAddress'))

If the answer to this question is true we’ll do nothing (as they’re already in the SharePoint group), if the answer to the question is No then we’ll add them to the SharePoint group in the next step

8C – Add User to SharePoint Team – we’ll use another “Send HTTP Request to SharePoint” action to add a User to the SharePoint Group. In this instance we’re going to be using the POST method rather than the GET method. The Uri is:

_api/web/SiteGroups(5)/users

The body of our request is:

{   "__metadata": {  
   "type":"SP.User"  
   },  
"LoginName":"i:0#.f|membership|@{outputs('Compose_EmailAddress')}"  
}  

Please note that the prefix “i:0#.f|membership|” is required for the login name, as this is part of how SharePoint handles claims based authentication

9. Parse SPTeamMembers – next we’ll use a Parse JSON action on the outputs from Step 6 above, and we’ll use the output of the Parse JSON step in step 10 below to loop through each returned user in the SharePoint Group. The schema for the Parse JSON action is:

{
    "type": "object",
    "properties": {
        "d": {
            "type": "object",
            "properties": {
                "results": {
                    "type": "array",
                    "items": {
                        "type": "object",
                        "properties": {
                            "__metadata": {
                                "type": "object",
                                "properties": {
                                    "id": {
                                        "type": "string"
                                    },
                                    "uri": {
                                        "type": "string"
                                    },
                                    "type": {
                                        "type": "string"
                                    }
                                }
                            },
                            "Email": {
                                "type": "string"
                            }
                        }
                    }
                }
            }
        }
    }
}

10. For each SP User – We’ll use an Apply to Each control to loop through the output results from the previous step

10A. Check if they are in the CRM Team – Similarly to step 8B, we’re going to use a Contains expression to check if the current SharePoint User’s email address is in the list of returned Users email addresses from Step 5

contains(string(body('Select_CRM_Users_Email_Addresses')),string(items('For_Each_SP_User')?['Email']))

If the answer to this question is Yes (the User is in both teams), then we’ll do nothing. If the answer to this question is No (the User is in the SharePoint group but is not in the D365 team) then we’ll run through the steps to remove them from the SharePoint group

10B. Get User ID – we’ll use another “Send HTTP Request to SharePoint” action to retrieve the ID of the User we want to remove from the SharePoint Group. We are using the GET method, and the following Uri:

_api/web/SiteUsers/getByEmail('@{items('For_Each_SP_User')?['Email']}')

We don’t need any headers or body parameters for this request

The output from this action will return JSON that looks like

As you can see, the User’s ID is under the path [‘d’][‘id’], so we’ll use this in the next step

10C. Remove User from SP Group – we’re going to use one more “Send HTTP Request to SharePoint” action to remove the User from the group. We’ll be using a POST method to perform the action, and the Uri for the action is:

_api/Web/SiteGroups(5)/users/removebyid(@{body('Get_User_Id')['d']['id']})

As you can see, we’ve specified the Site Group number we want to remove the User from, and then taken the ID from the step above to specify the User we want to remove.

11. Update Account – the final step in the Flow is to use an Update Record step to set the “Last Sync Date” field to the current date using a utcNow expression

We will also set the “Sync with SharePoint” field back to No so it is ready for the next time the Team needs to be synced

As we set the filter expression in the trigger to only fire the Flow when this field equals Yes, changing the value back to No will not trigger a new Flow

Conclusion

This has hopefully given you an overview of how relatively straightforward it could be to synchronise security between Dynamics 365 records and an associated SharePoint site. There are a couple of things you may wish to consider alongside this:

  1. If you’re going to have multiple entities enabled for Document Management, you may wish to put the logic fro synchronising permissions in a Child Flow that could then be called by any entity
  2. As discussed above, good practice would dictate that you should always dynamically retrieve the specific SharePoint Group ID you want to synchronise permissions with, rather than hardcoding a value
  3. You may wish to set this to run on a schedule so permissions are synced automatically every X hours/days/weeks, etc.
  4. As of the date of publication, Flows cannot be triggered on N:N Associate/Dissociate actions in Dynamics 365, but you could use a trigger when a new record is created/deleted in the teammembership entity, or alternatively you could use a solution like North52 to create a custom trigger. I am personally more in favour of not using this approach for two reasons:
    1. Power Automate flows are currently asynchronous only, so this means you could potentially run into issues with concurrency if you are adding/removing multiple people at the same time from teams, which would lead to Dynamics 365 and SharePoint being out of sync
    2. If you have lots of teams, and the membership changes frequently, then you could trigger a lot of Flow runs, compared to this method which catches all changes in a single run

If you do find this useful I’d love to hear from you, please reach out to me on social media or drop a comment below to give me your thoughts!

Better Integration Between Dynamics 365 and SharePoint – Part 2

In my previous post I discussed how to improve the integration between Dynamics 365 and SharePoint by creating a site collection for each record, instead of using the OOTB integration.

Now that you have a site, you might give some thought as to how you will structure your data; typically SharePoint best practice would tend to suggest you should use metadata instead of folders, but if you do need to segregate information then the recommendation would be to use Document Libraries.

In this post I will demonstrate how you can add Document Libraries to the SharePoint site for a record and have it visualised on the Dynamics 365 record. There are two approaches for this:

  1. Triggering the creation of a Document Library from the Dynamics 365 record
  2. Creating the Document Library directly in SharePoint and syncing with D365

For each method, I have created a Power Automate Flow and I’ll run through the key features below.

Creating A Document Library from Dynamics 365

1. When a Record is Selected – the first step is to use the “Common Data Service – When a Record is Selected” trigger. This trigger is only available in the “old” CDS connector (see this great post from Sara Lagerquist for a comparison between the CDS connectors). In order to be able to use the When a Record is Selected trigger you have to ensure the Flow is not in a solution, as it will not be able to select otherwise. One of the best things about using this trigger is that you can also request input values from Users, so in this case we’re going to ask the Users to input their desired Document Library name

2. Get Related SharePoint Site – next we’ll use a List Records action to get the related SharePoint site. In this step we’ll use an OData filter to look for sites where the Absolute URL matches the SharePoint site URL for our Account

3. Compose SharePoint Site ID – we will use a Compose step to extract the SharePoint site ID from the SharePoint site record we’ve returned in the previous step. As we’ll only have one SharePoint site per record, we don’t need to use an Apply to Each control, rather we can use a First expression to extract the specific field value. The expression I’ve used is:

first(outputs('Get_Related_SP_Site')?['body/value'])?['sharepointsiteid']

4. Create Document Library – we will use the “Send HTTP Request to SharePoint” action to create a Document Library on our Account site. The Send HTTP Request action allows you to leverage the full SharePoint REST API to do actions that aren’t available with the OOTB connector. If you’re not aware, Microsoft have some great resources available to help you understand the REST API, so I’m just using the instructions available here to create a Document Library. (This does say working with Lists, but Document Libraries are really just a fancy kind of list)

There are a few aspects to this action we need to fill in:

  1. Site Address – we will use the Site Address from the custom field on our Account record
  2. Method – as we’re creating a Document Library we’re going to be using the POST method
  3. Headers – we will be specifying that we are sending a JSON request (content-type) and expect a JSON back (accept)
  4. Body – Microsoft have helpfully outlined the key elements of the body JSON at the link. They key values we need to specify are:
    1. BaseTemplate: 101 – this signifies that this is a Document Library
    2. Title – this will be the value that is input in our trigger

The Header JSON is:

{
  "Accept": "application/json;odata=verbose",
  "Content-Type": "application/json;odata=verbose"
}

The Body JSON is:

{
 "__metadata": {
 "type": "SP.List"},
 "BaseTemplate": 101, 
 "ContentTypesEnabled": false,
 "Description": "Created by Flow",
 "Title": "@{triggerBody()['text']}" 
}

5. Create a Document Location – the final step is to use a Create a Record action to create a Document Location record in Dynamics 365. We need to input the following information:

  1. Name – we will use the input value from the trigger
  2. Service Type Value – set this to SharePoint
  3. Relative URL – we will use the input value from the trigger
  4. Parent Site or Location ID – we will use the output from the Compose step at Step 3 above
  5. Parent Site or Location Type – set this to SharePointSites
  6. Regarding Object ID – we will set this to the Account ID from the trigger
  7. Regarding Object Type – set this to Accounts

When this is all done, we can use the Flow “on-demand” to create Document Libraries and an associated Dynamics 365 Document Location on any Accounts in our organisation that have a SharePoint site.

Note: I have not added any error handling to this Flow, but you may wish to include some guard conditions to ensure you don’t try and create document libraries against records with no associated SharePoint site

CREATING DOCUMENT LIBRARY FROM SharePoint and Syncing to Dynamics 365

Steps 1 – 3 are the exact same as Steps 1-3 in the previous Flow (i.e. use the When a Record is Selected Trigger (though we don’t need an input value for this Flow), then List Records to get the associated SharePoint Site record, then a Compose step to extract the SharePoint Site ID.

4. List all related Document Locations for Account – next we will use a List Records step to find all Document Locations in Dynamics 365 related to the SharePoint site record for the Account

5. Select key values from returned JSON – in order to remove the noisiness from the returned JSON for the List Records step above we will use a Select action to extract the following values for each Document Location:

  1. Name
  2. Relative URL
  3. ID

6. Get all Lists and Libraries – we’ll use the standard Get all Lists and Libraries action to return a list of the Document Libraries on the site. For the Site Address we’ll input the SharePoint Site URL from the custom field on our Account entity

7. Apply to each returned SP Document Library – for each Document Library that is returned in the step above, we’ll loop through them to check if they are already in Dynamics 365 and, if not, we’ll create a Document Location for them

7A – Is there a D365 Document Location for the SharePoint Doc Library? – we’re using a condition control here to check if the SharePoint Document Library appears in the list of D365 Document Libraries with a Contains expression. The expression I’ve used is:

contains(toLower(string(body('Select_key_values_from_returned_JSON'))),toLower(items('Apply_to_each_Returned_SP_Document_Library')?['DisplayName']))

7B – If No then Create a New Document Location in D365 – if there is not a D365 Document Location existing for the SharePoint Document Library then we’ll use a Create a new Record action to create one. We need to input the following information:

  1. Name – we will use the DisplayName from the returned SharePoint Document Library
  2. Service Type Value – set this to SharePoint
  3. Relative URL – we will use the DisplayName from the returned SharePoint Document Library
  4. Parent Site or Location ID – we will use the output from the Compose step at Step 3 above
  5. Parent Site or Location Type – set this to SharePointSites
  6. Regarding Object ID – we will set this to the Account ID from the trigger
  7. Regarding Object Type – set this to Accounts

Note: if a User inputs any invalid characters in the title of the Document Library on create, or if they change the name of the Document Library after it is created, then this Flow may not execute perfectly. In those situations we’d have to include workarounds with the “Send HTTP Request to SharePoint” action and utilise the REST API

Conclusion

With the two Flows I have outlined above we can enable Users to add Document Libraries to their SharePoint sites from either the Dynamics 365 record or the SharePoint site, and be able to interact with them directly from the Dynamics 365 record. From my own experience, I know that this kind of flexibility is appreciated by Users.

Better Integration between Dynamics 365 and SharePoint using Power Automate — Part 1

If you’ve used the standard OOTB connection between Dynamics 365 and SharePoint then I’m sure, like me, you’ll have found your share of frustrations.

The technical functionality is great, allowing you to see your documents stored in SharePoint in a subgrid on the related Dynamics 365 record, however the standard implementation will probably make your SharePoint admins cry because it uses a single SharePoint Site, with a Document Library for each Entity, and a Folder for each record.

Whilst this approach sort of makes sense; at scale it becomes pretty unmanageable and it runs counter to any recognised SharePoint best practices. In my organisation we wanted to have a SharePoint site per record which would allow us to control security much more robustly. Peter Baddeley has blogged about similar issues before and I’d highly recommend reading his posts about this.

The Scenario

In my organisation we have Client SharePoint sites, linked to the Account record in Dynamics 365. Each of these SharePoint sites can have one or many Document Libraries depending upon the requirements of the Client. We then have a custom entity for Projects, and each Project has a SharePoint Site with one or many Document Libraries. Finally, each Project may have one or many Work Streams, and each of the Work Streams may have one or many Document Libraries

The relationships between the entities and the two systems can be visualised as below:

The Setup

As indicated above, in my scenario we have some custom entities:

  • Project
    • Lookup to Account entity
  • Work Stream
    • Lookup to Account entity
    • Lookup to Project entity

Note that while there is a parent:child relationship between Accounts and Projects, and Projects and Work Sites, this doesn’t have to be reflected in SharePoint, thus we can avoid getting into nested site structures in SharePoint and take advantage of modern functionality like Hub Sites.

As part of my demonstration I’ll also add a few custom fields to my Account entity:

  • Create SP Site – two option field I’ll use to trigger my Flow to run
  • Reference ID – An autonumber field to generate a unique ID for each Account, that we’ll use for the new site URL
  • SP Site URL – a field to hold the URL for the site we’re creating, which we’ll use in Part 2 and Part 3 of this series

A key part of the setup is also to ensure that you’ve set up SharePoint integration and enabled Document Management on the entities we’ll be using – see the Microsoft documentation for more info on how to do this. As we’re creating a custom document management structure, you might want to avoid the default document location logic from firing – Alex Shlega covered this in his blog about custom folder structures for SharePoint integration.

The Solution

Now that we have a clear understanding of our scenario, we need to create a custom document management structure using a Power Automate flow. Before we jump into this you should be aware that the standard SharePoint Flow connector doesn’t allow you to create SharePoint Site collections, it will only allow you to create subsites. To work around this restriction we’re going to use an Azure Automation runbook to execute some PowerShell.

Azure Automation

I had written a lengthy explanation of how to create an Azure Automation runbook that we could call from a Flow, but then I found this post from Planet Technologies that explains so straightforwardly how to do this that I’d rather just link you to their blog. If you’ve never created an Azure Automation runbook, or you feel intimidated by the idea of PowerShell then I can assure you that you have no reason to worry. The steps in this blog are super easy to follow!

In my Azure Automation Runbook I’ve added a step using the Register-PnPHubSite cmdlet to register my Client (Account) site as a Hub site. By doing this I can then associate my Project and/or Work sites to this Hub using the Add-PnPHubSiteAssociation cmdlet, without having to implement a nested site structure.

The Flow

1. When a Record is Updated – for the trigger I’m using the “When a Record is Created, Updated or Deleted” trigger from the Common Data Service (Current Environment) Connector. In this instance I’m using the Update trigger condition, to check when the new “Create SP Site” field I created is set to “Yes”. Note below that I’ve set the Filtering attributes to this field, and set a Filter expression to only trigger the flow when the value of this field is True

2. List the Default SP sites to get the Base URL – next I am using a List Records step with a FetchXML query to retrieve the Default SharePoint site URL. When you set up your integration with SharePoint you would have specified a site, and this is listed in Dynamics 365 as a default site, so we can retrieve this easily. The FetchXML query I used is:

<fetch version="1.0" output-format="xml-platform" mapping="logical" distinct="false">
  <entity name="sharepointsite">
    <attribute name="name" />
    <attribute name="parentsite" />
    <attribute name="relativeurl" />
    <attribute name="absoluteurl" />
    <attribute name="validationstatus" />
    <attribute name="isdefault" />
    <order attribute="name" descending="false" />
    <filter type="and">
      <condition attribute="isdefault" operator="eq" value="1" />
    </filter>
  </entity>
</fetch>

3. Compose AbsoluteURL – As I’m only returning a single record in the List Records step above, I will use a Compose action to retrieve the Absolute URL field value, rather than having to use an Apply to Each step. To do this, we use a First expression to retrieve the first returned value, then we’ll interrogate the JSON to get the value we want. The expression I used is:

first(outputs('List_the_Default_SP_sites_to_get_the_Base_URL')?['body/value'])?['absoluteurl']

4. Initialise SiteURL – next we’ll create a string variable for the Site URL of the new SharePoint site we’re going to create. To do this, we’ll use the output of the compose step above, append it with the value “/sites/” (as the new site will be within the sites managed path in SharePoint) and then complete it with the autonumber value from the new Reference ID field we created.

Note: if you want to use the name of your record in D365 for the URL you might need to strip out any “dangerous” characters for the URL. In this case you could follow the great advice from AlanPS1 on his blog for stripping unwanted characters

5. Create Azure Automation Job – now that we have our Site URL for the new site we want to create we’re going to use the Create Job action from the Azure Automation connector. In this action you’ll specify the Subscription, Resource Group, Automation Account and Runbook Name we created above. This will then bring up the Input parameters you specified in your runbook. In my case I just need the Site URL and the Account Name for my site title. Note that I’ve set “Wait for Job” to Yes, this is important to ensure the Job is completed before the action is marked as complete in your flow.

6. Create a new SP Site record – after the Azure Automation has done it’s work and created the SharePoint site we’re going to create a SharePoint Site record in Dynamics 365 for it. With this SharePoint Site record we will set the Absolute URL to the SiteURL we created earlier.

7. Create a new Document Location for Account – the final step in the Flow is create a Document Location record in D365 for the Account so we can actually see the SharePoint site and the documents stored there when we look at the Account record in D365. For the purposes of this demo I’m just creating a SharePoint Document Location for the default Documents document library that is created when you create a SharePoint site, so I know that the Name is “Documents” and the Relative URL is “shared documents”. If you were using a Template that created multiple document libraries you could use the SharePoint “Get all Lists and Libraries” action to retrieve them all then create a new Document Location for each Library that is returned.

One thing to note here is that when I’m setting the Lookup fields I have to put them in the format “/PluralofEntityName(GUID)”. This is due to a known bug with the Common Data Service (Current Environment) connector – see this blog by Sara Lagerquist for more information on this issue.

Conclusion

In this blog post I wanted to demonstrate how easy it can be to create an advanced custom integration between Dynamics 365 and SharePoint, and how accessible it is even to non-developers like me now that we have such advanced functionality available to us in Power Automate flows and Azure Automation runbooks.

Implementing a custom integration allows you to implement proper security management, and makes the solution much more scalable for proper document management functionality. In the next blog I’ll show you how to create new SharePoint Document Libraries from within Dynamics 365.

If you think this is useful I’d love to get your thoughts on it, please drop a comment below or reach out to me on Twitter or LinkedIn!